Hello! Thank you for reading this guide. I’m here to introduce you to the desktop cafe restaurant management program I have recently developed. This program is designed to simplify the management of your business and increase efficiency.
Firstly, thanks to the user-friendly interface of our program, you will be able to easily perform all essential operations in your business. You can manage tasks such as staff management, order tracking, inventory control, and table arrangements through this program.
Furthermore, with the reporting features provided by our program, you can track your business’s performance in real-time. By obtaining data such as income-expense analysis, popular products, and customer preferences, you can make more informed decisions.
Due to the powerful and secure infrastructure of our software, your business data is completely protected. The security and confidentiality of your data are our top priorities. I will guide you step by step through the basic features of our software and explain in detail how to use it. If you’re ready, let’s start exploring our program right away!
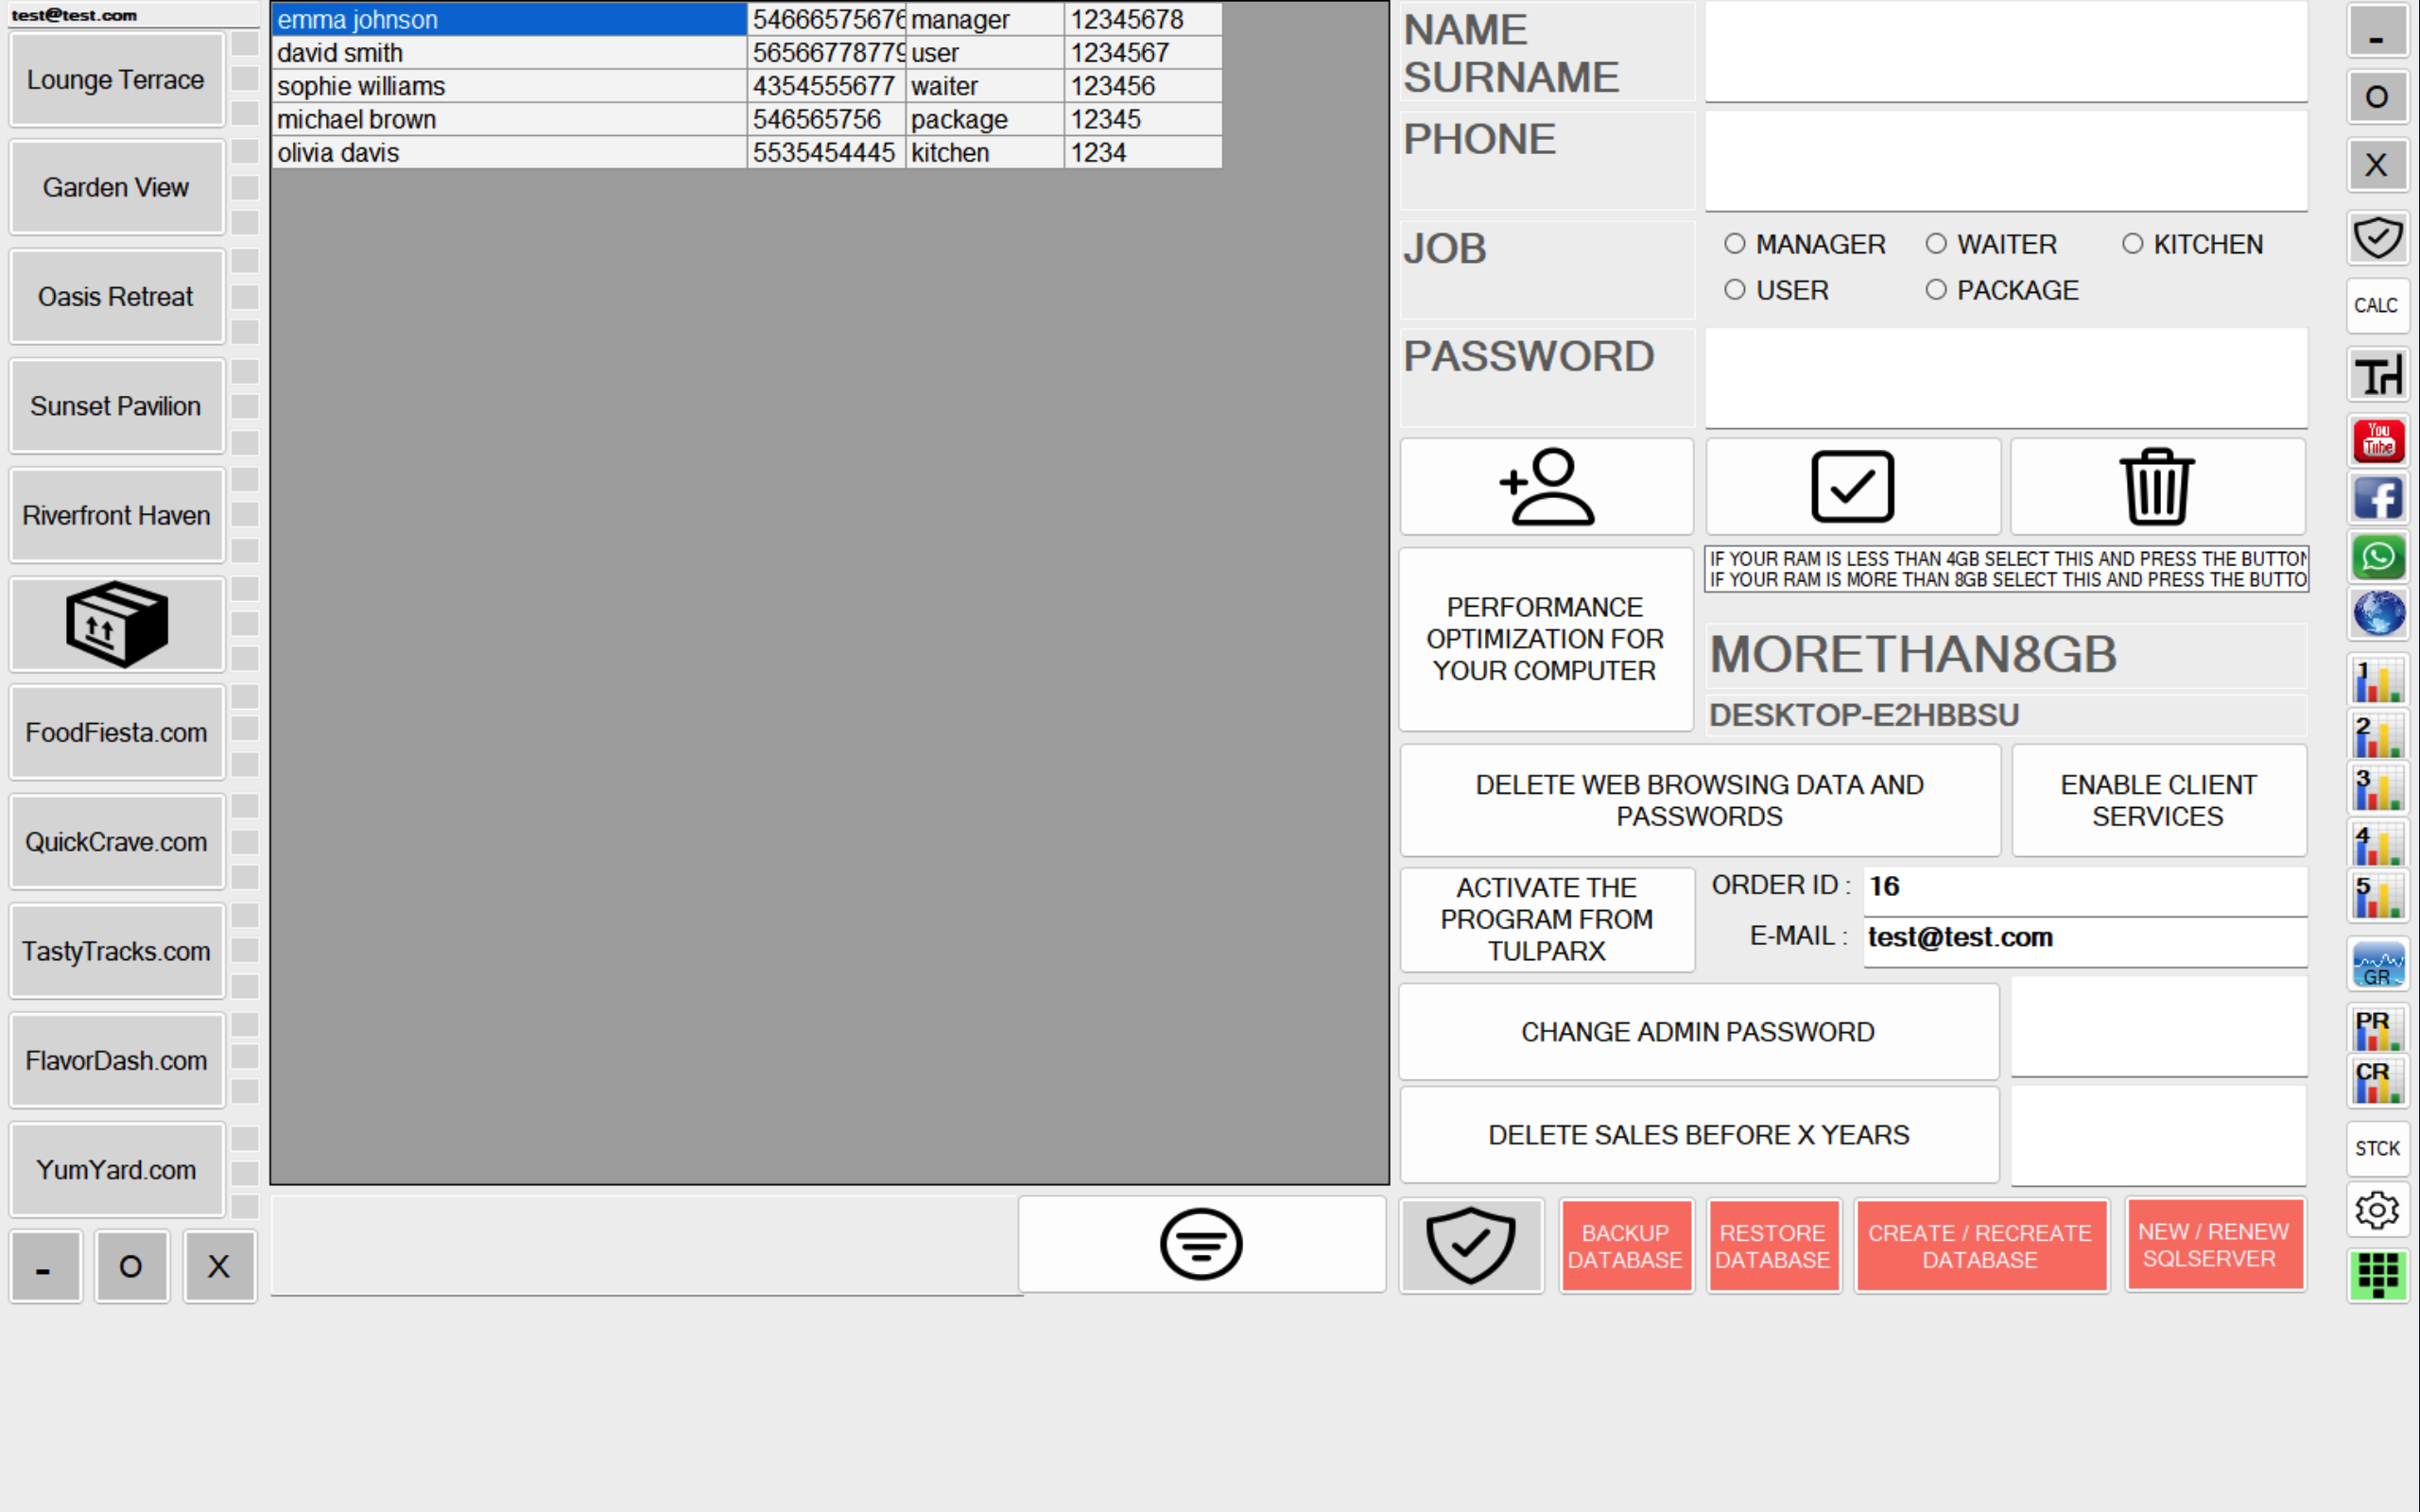
Program Settings After completing the program installation, a password screen will appear. Enter the initial password “123456789.” Then, click on the person icon in the settings menu at the bottom right corner.
A blank row will appear within the gray section next to the icon. Double-click on this row to make it orange. Fill in the fields for name, surname, phone, user type, and password on the right side. Click the confirmation box. Note that when setting a password, it can be up to 10 characters and must consist entirely of numbers. If you need to make changes to the information of an added user, double-click on the user in this menu.
A user with the Manager role does not have the authority to make changes on the left menu of the main page. They cannot modify web page addresses created in the browser, view reports, stocks, or settings.
A user with the User role has limited access. In addition to the areas inaccessible to the Manager role, they cannot make any changes in any menu and cannot modify or delete an approved order.
Users with roles Waiter, Kitchen, and Package do not have permission to use the main program. These users can only use sections that match their job descriptions in the other program.
Below this gray area, there is a filtering section. Double-click in this area, type anything related to the person you are looking for based on any registered data, and filter the list. For example, typing “waiter” will show only waiters, or typing “ma” will list those with “ma” in their names—a useful feature for busy businesses. All filters in the program work in the same way.
To click the “delete web browsing data and passwords” button, first click once on the padlock icon at the bottom and make it green or active. Clicking this button will clear all web history, passwords, and cookies.
Enter your email address and order ID in the ID and mail address boxes, which you used during program registration. The program will not work if your ID and email address do not match. Click on the “Activate the program” button (while ensuring the lock below is green) to activate the program.
If you want to change the initial password “123456789,” enter a numeric password of up to ten characters in the blank space next to “change admin password.” Ensure the lock below is green before clicking the button.
The “delete sales before x years” button is added to prevent the program from slowing down over the years due to a large amount of data. Enter the desired year in place of x to delete all sales records before that year.
Clicking the “delete / create database” button (with the lock green again) will erase all existing data, including user data, customer information, menus, and sales. It creates a new empty database.
The “New sqlserver” button allows the installation of necessary parameters for the program’s initial setup. After entering the password, click this button and follow the instructions.
The “Backup database” button allows us to create a backup of the database (only on a USB disk). We can load our backup from any location using the “Restore database” button.
If other computers are connected to this computer, click the “Enable client services” button and follow the instructions. A folder will be created on the desktop, and the file inside it should be run as an administrator. This allows other computers to connect.
The hostname of your main computer is displayed above the “Enable client services” button. When connecting client computers, select this address.
Before clicking the “Performance optimization” button, choose the appropriate RAM limit. The color of the lock icon in the bottom right corner of the home page indicates user features:
- Green: Administrator
- Blue: Manager
- Pink: User
- Red: Waiter
- Yellow: Kitchen
- Purple: Package
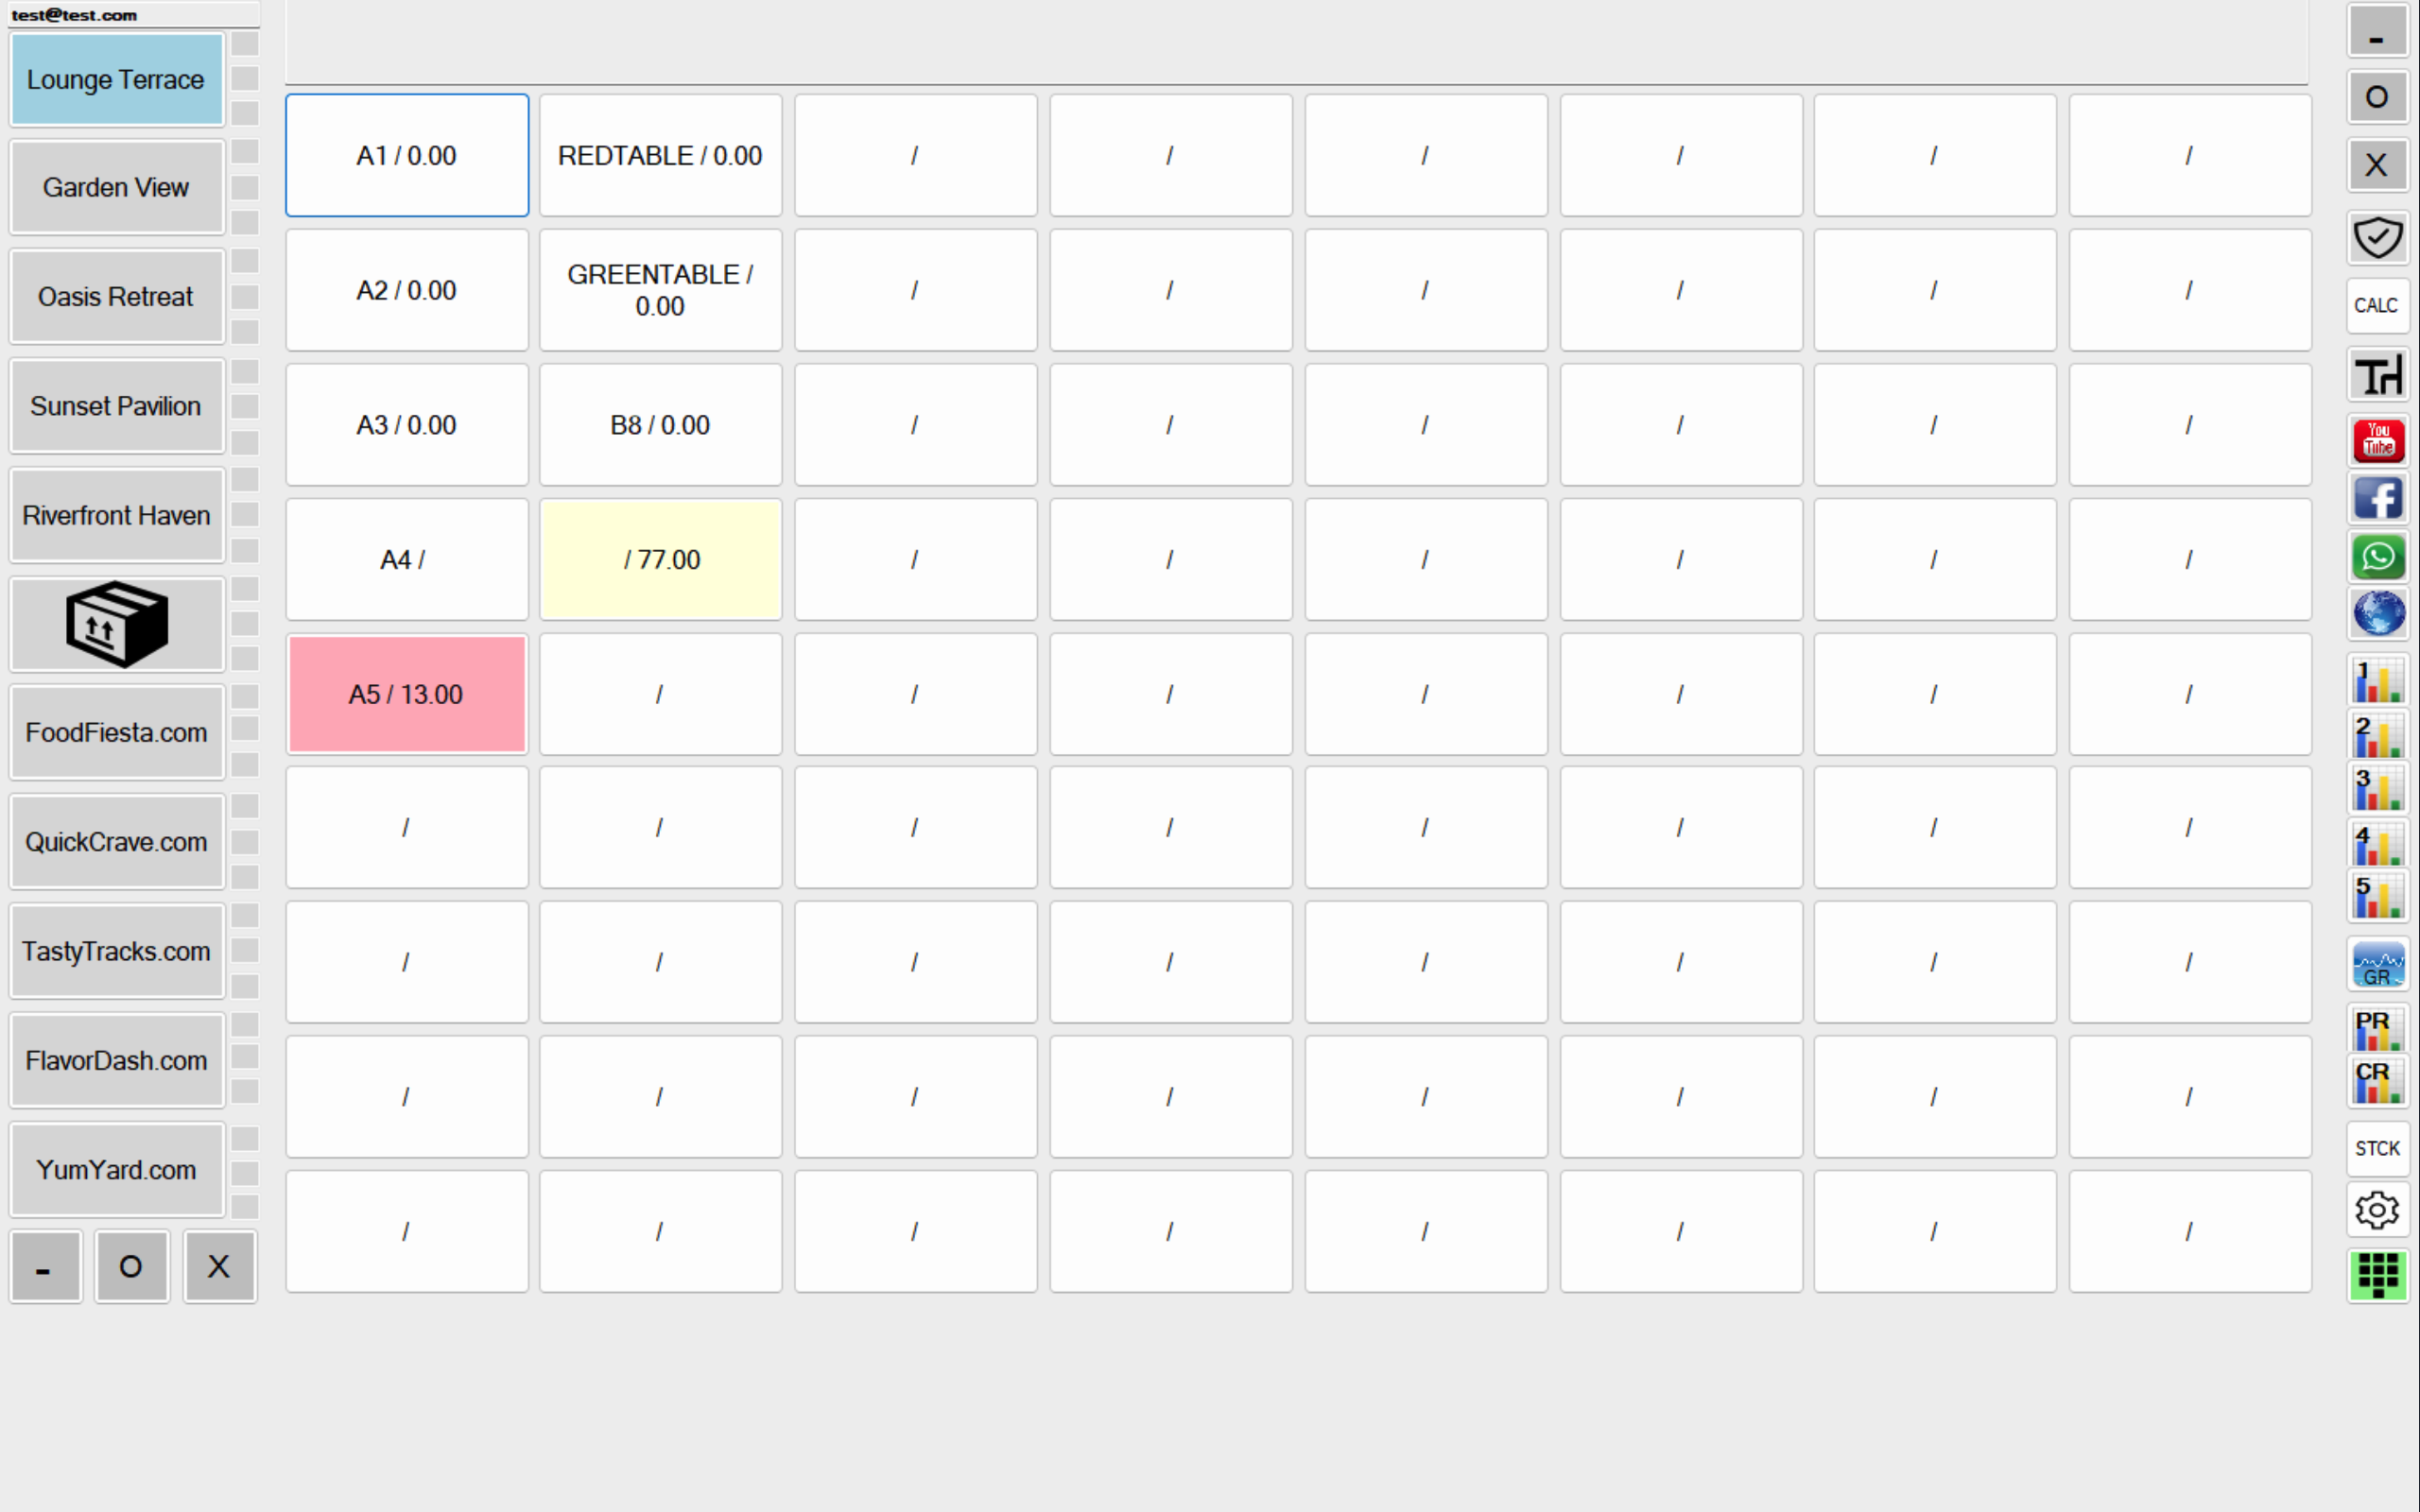
In this area, you can assign names to the first five sections on the left. For example, you can give names like “Hall,” or for a multi-floor business, you can use names for different floors or kitchen sections (such as Japanese cuisine, Turkish cuisine, etc.). You can apply custom labels and arrangements. Each button in this section corresponds to 72 tables. You can also customize and name them as you wish.
At the bottom of this section, there is a package symbol. Here, you can access an additional 72 tables and make adjustments as desired. Below that, there are spaces designated for defining web addresses for up to 5 web order platforms. If you choose to use them, it can make tracking orders from these platforms more convenient.
When you want to make adjustments in all menus, right-click on the button you want to modify. In the opened window, you can enter the desired information for customization and complete the process. Users with Administrator and Manager privileges can make such changes. Users with roles User, Kitchen, and Package can only access sections relevant to their job descriptions.
In this area, you single-click on one of the empty boxes where you’ve named table numbers, and you enter it. It leads you to a screen like the one below.
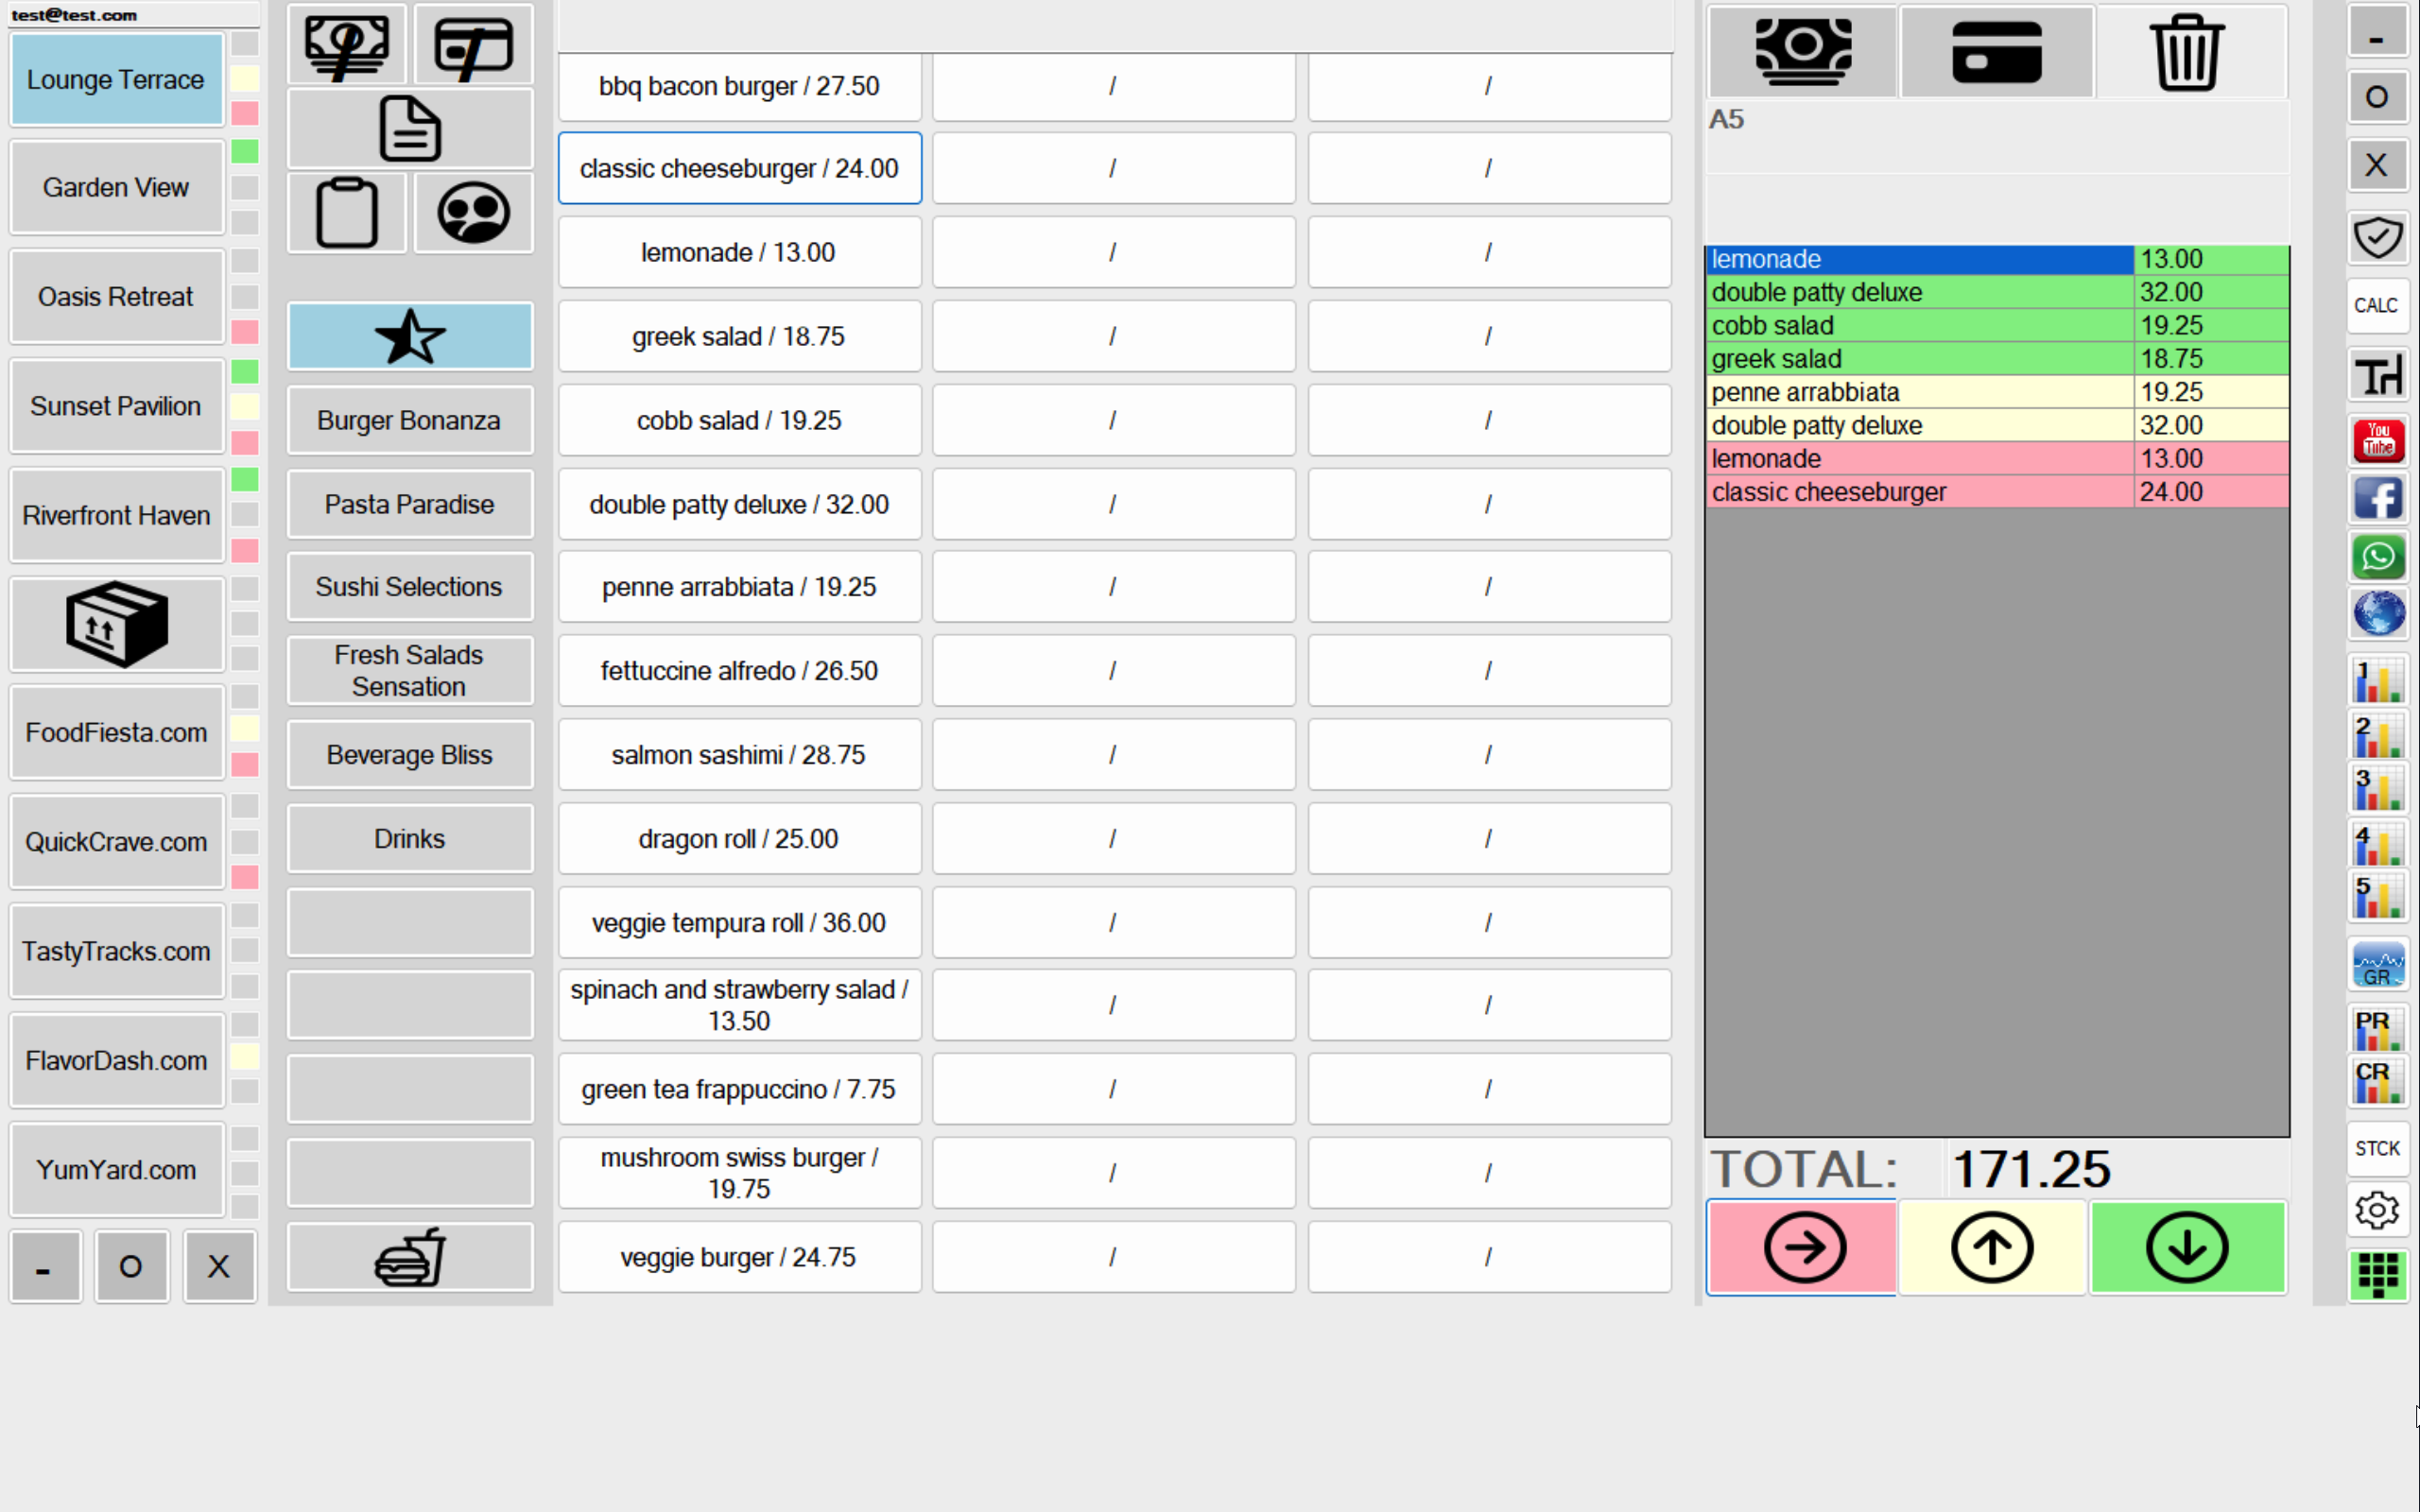
In this screen, the most prominent menu is the Favorites menu inside the star icon. This menu arranges the products you’ve sold the most in the last month in sales order, providing you with ease of use. You can also customize the order of the menus under the other menus below as per your preference (e.g., salads, grilled items, etc.). Each menu button allows you to define up to 45 products. Therefore, you can define a total of 10 menus with a maximum of 450 products. The button at the bottom with the burger and package drink symbols is designed for creating promotional menus with existing items in your menu. For example, you can add one existing drink and one desired burger to create a discounted menu. To do this, right-click on this button first.
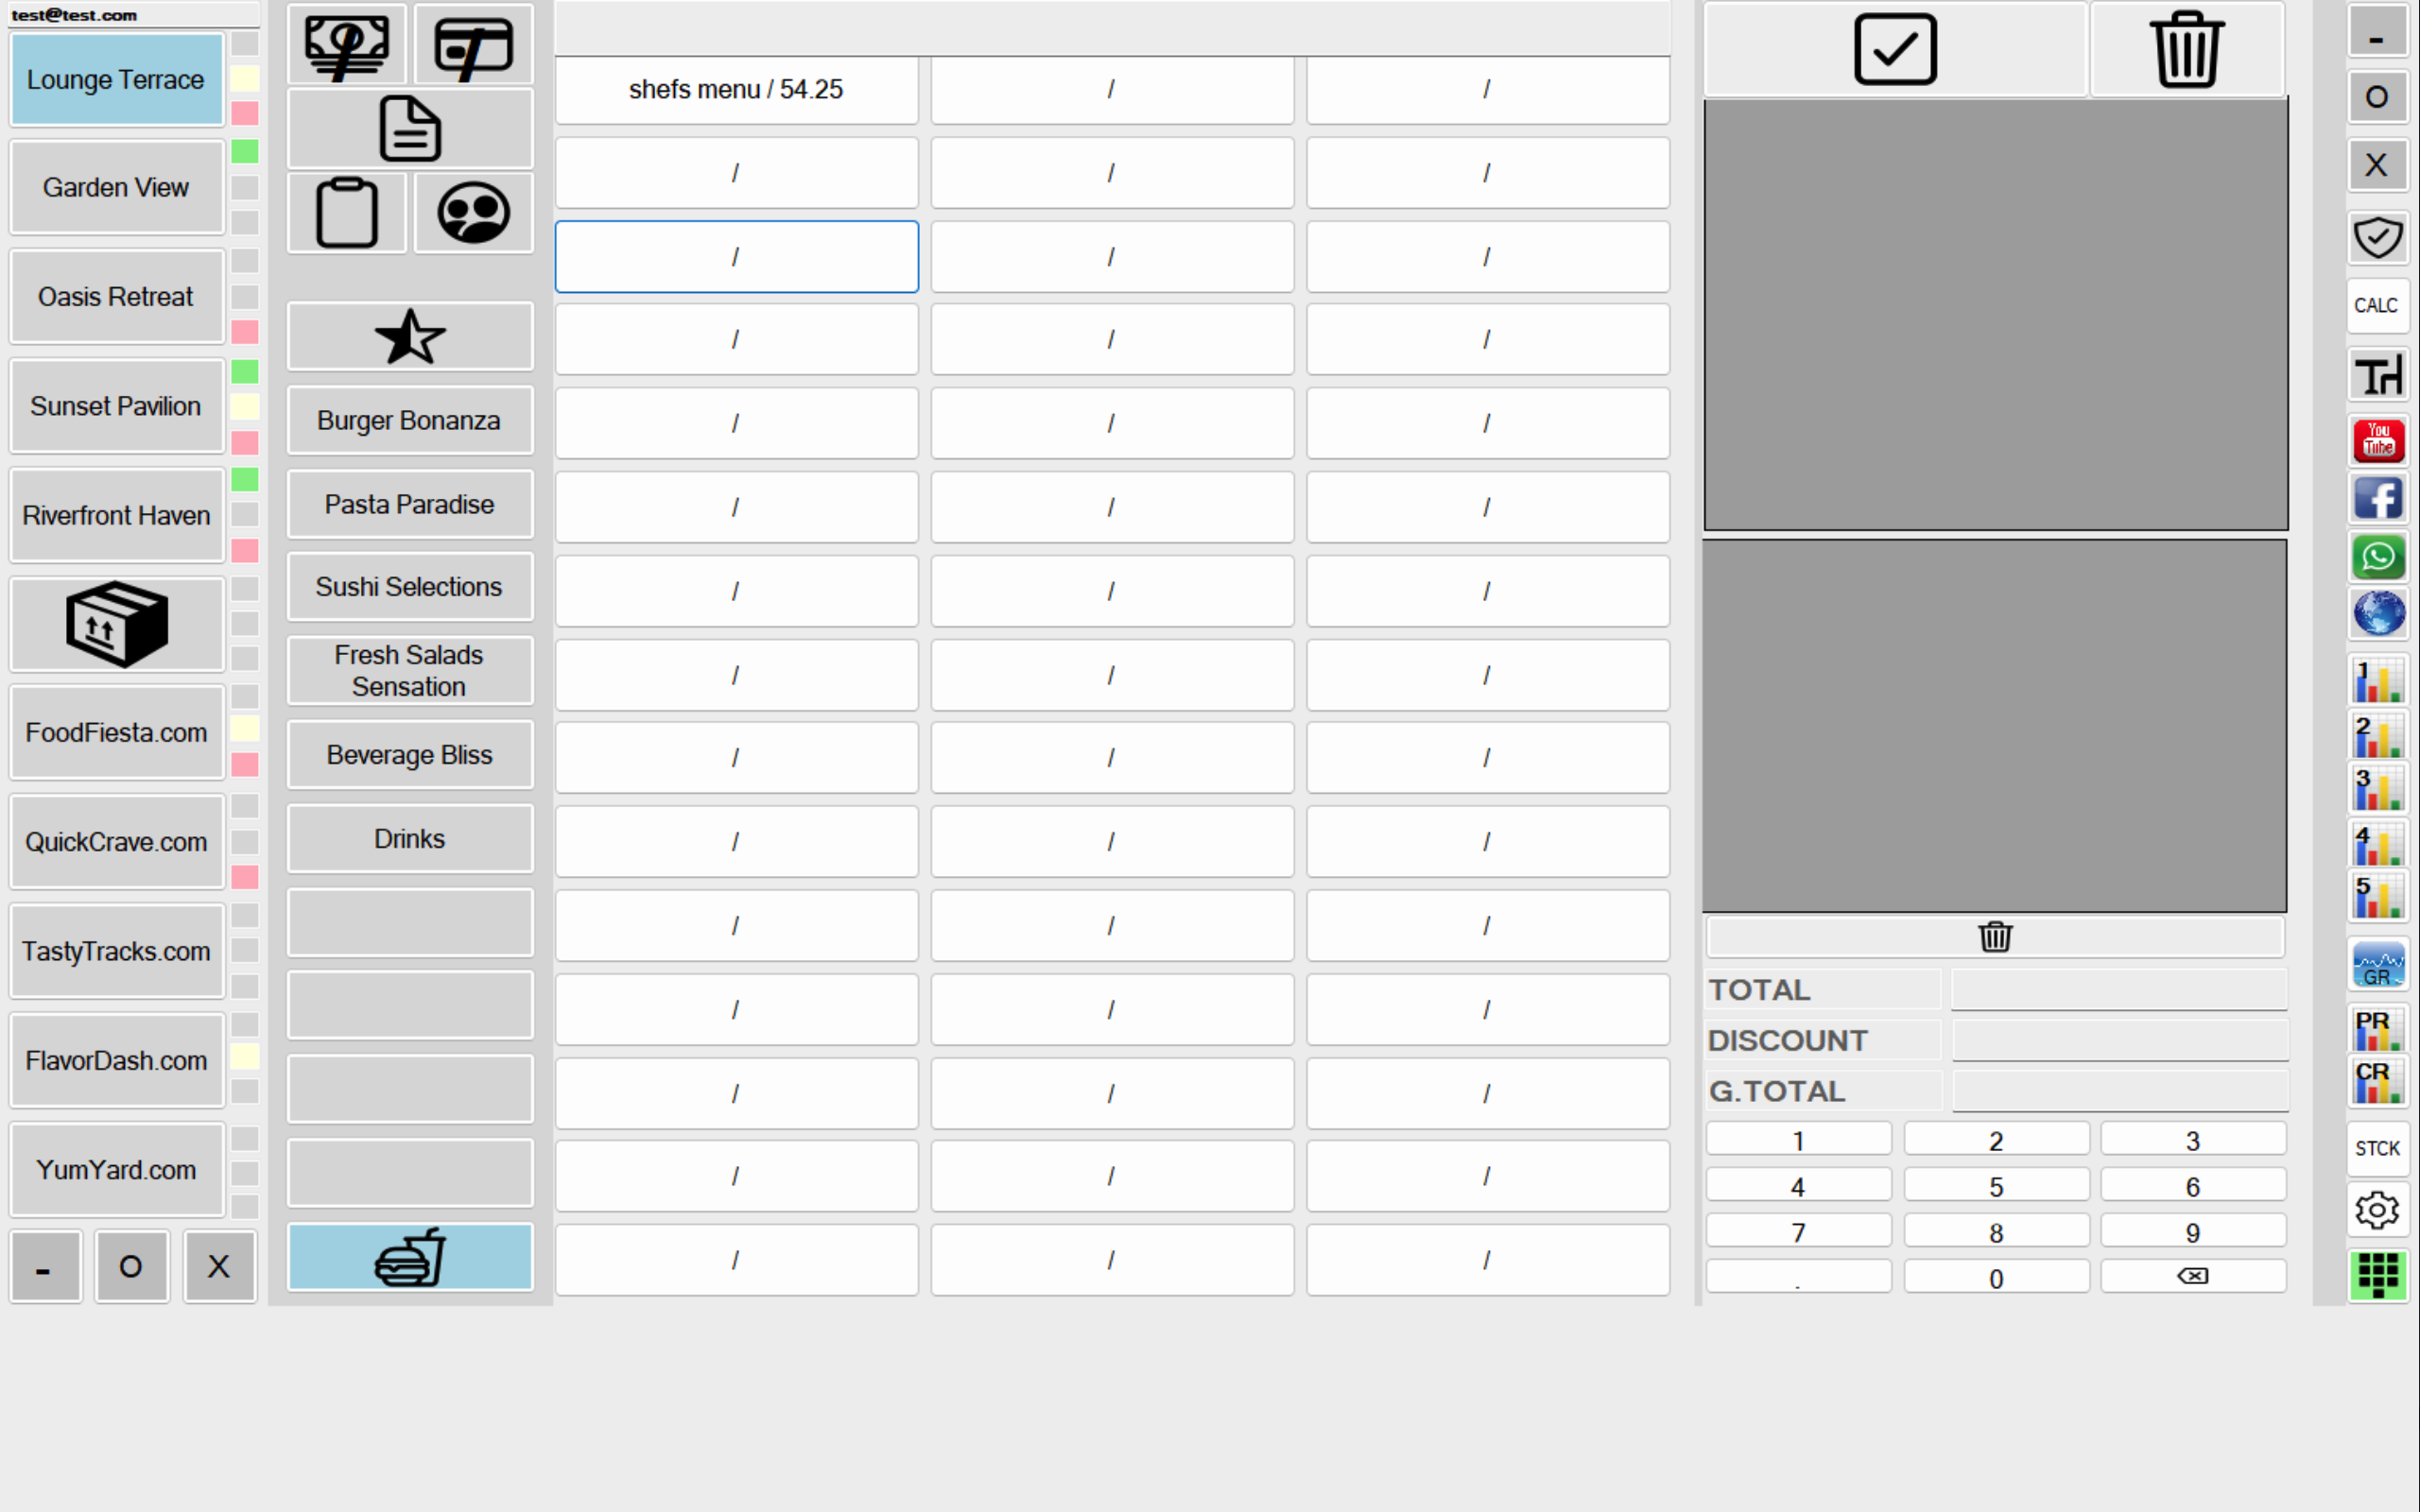
You will encounter a screen like this where you can create up to 45 discounted menus. When you right-click on one of the buttons, you enter the name of the menu you will create. Clicking on the same button with the left mouse button turns the button orange, and you can start creating or editing your discounted menu. At this point, all your products are listed in the top right corner of the screen. When you double-click on the product you want from these items, the product is added to the list below. This way, you can add various items (drinks, chips, etc.) to the list and create a discounted menu. The important thing to note here is that when applying a discount, you need to make adjustments based on the total price in the opened window. In the section named “Discount,” you can enter the desired price using the number buttons and complete the recording by clicking on the checkmark in the top right corner. If there is a product you mistakenly added to the list and want to remove, double-click on the product you want to remove (the color of the product turns orange), and when you click on the small trash bin icon, the selected product is removed from the list. The large trash icon completely deletes the menu created on the button.
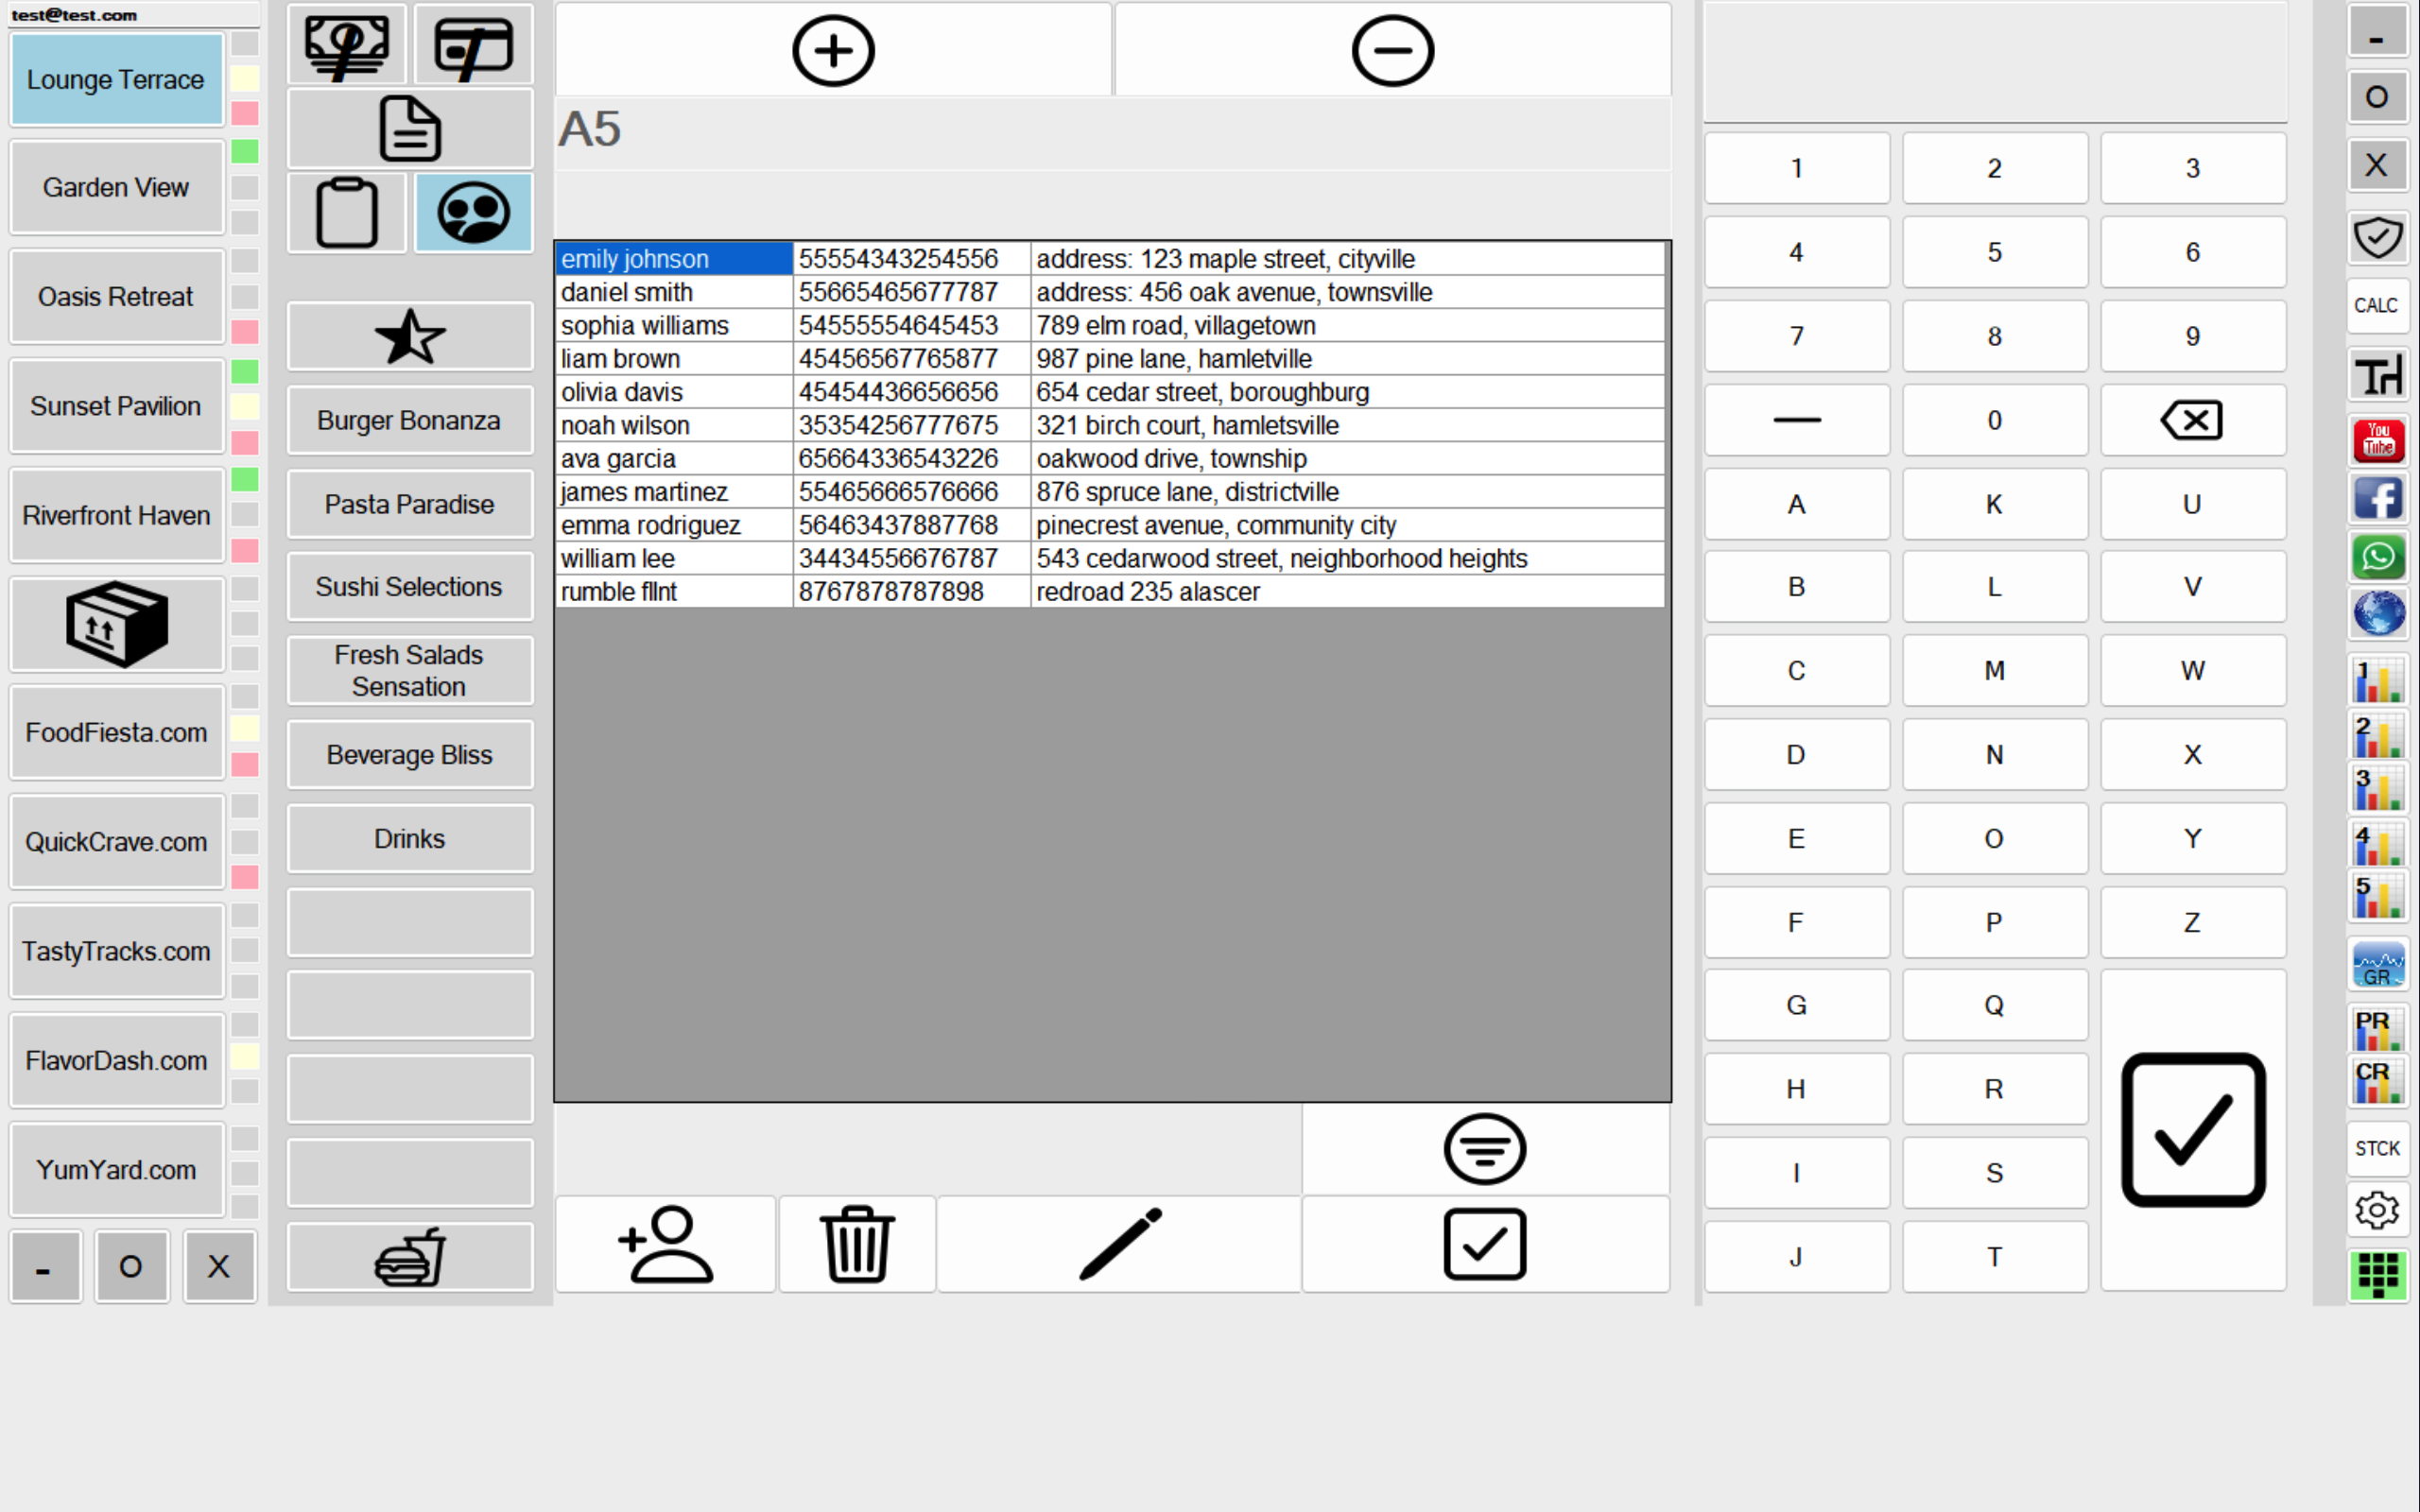
Using the marked button on the screen, you can create defined customers. When you click on the button, a screen appears where customer data can be modified, new customers can be added, tables can be reserved for customers, or reservations can be canceled. Additionally, you can open a reserved record for tracking customers’ eating habits.
When you double-click on a customer, it turns orange. In this position, clicking the plus button above adds the customer to the table, and clicking the minus button removes the customer from the table. Clicking the pencil icon allows you to edit the existing customer information. After making changes to customer information, it is necessary to save, otherwise, the changes will not be applied.
If you click the plus customer icon, a new customer row is opened. Operations can be performed within this row as described above.
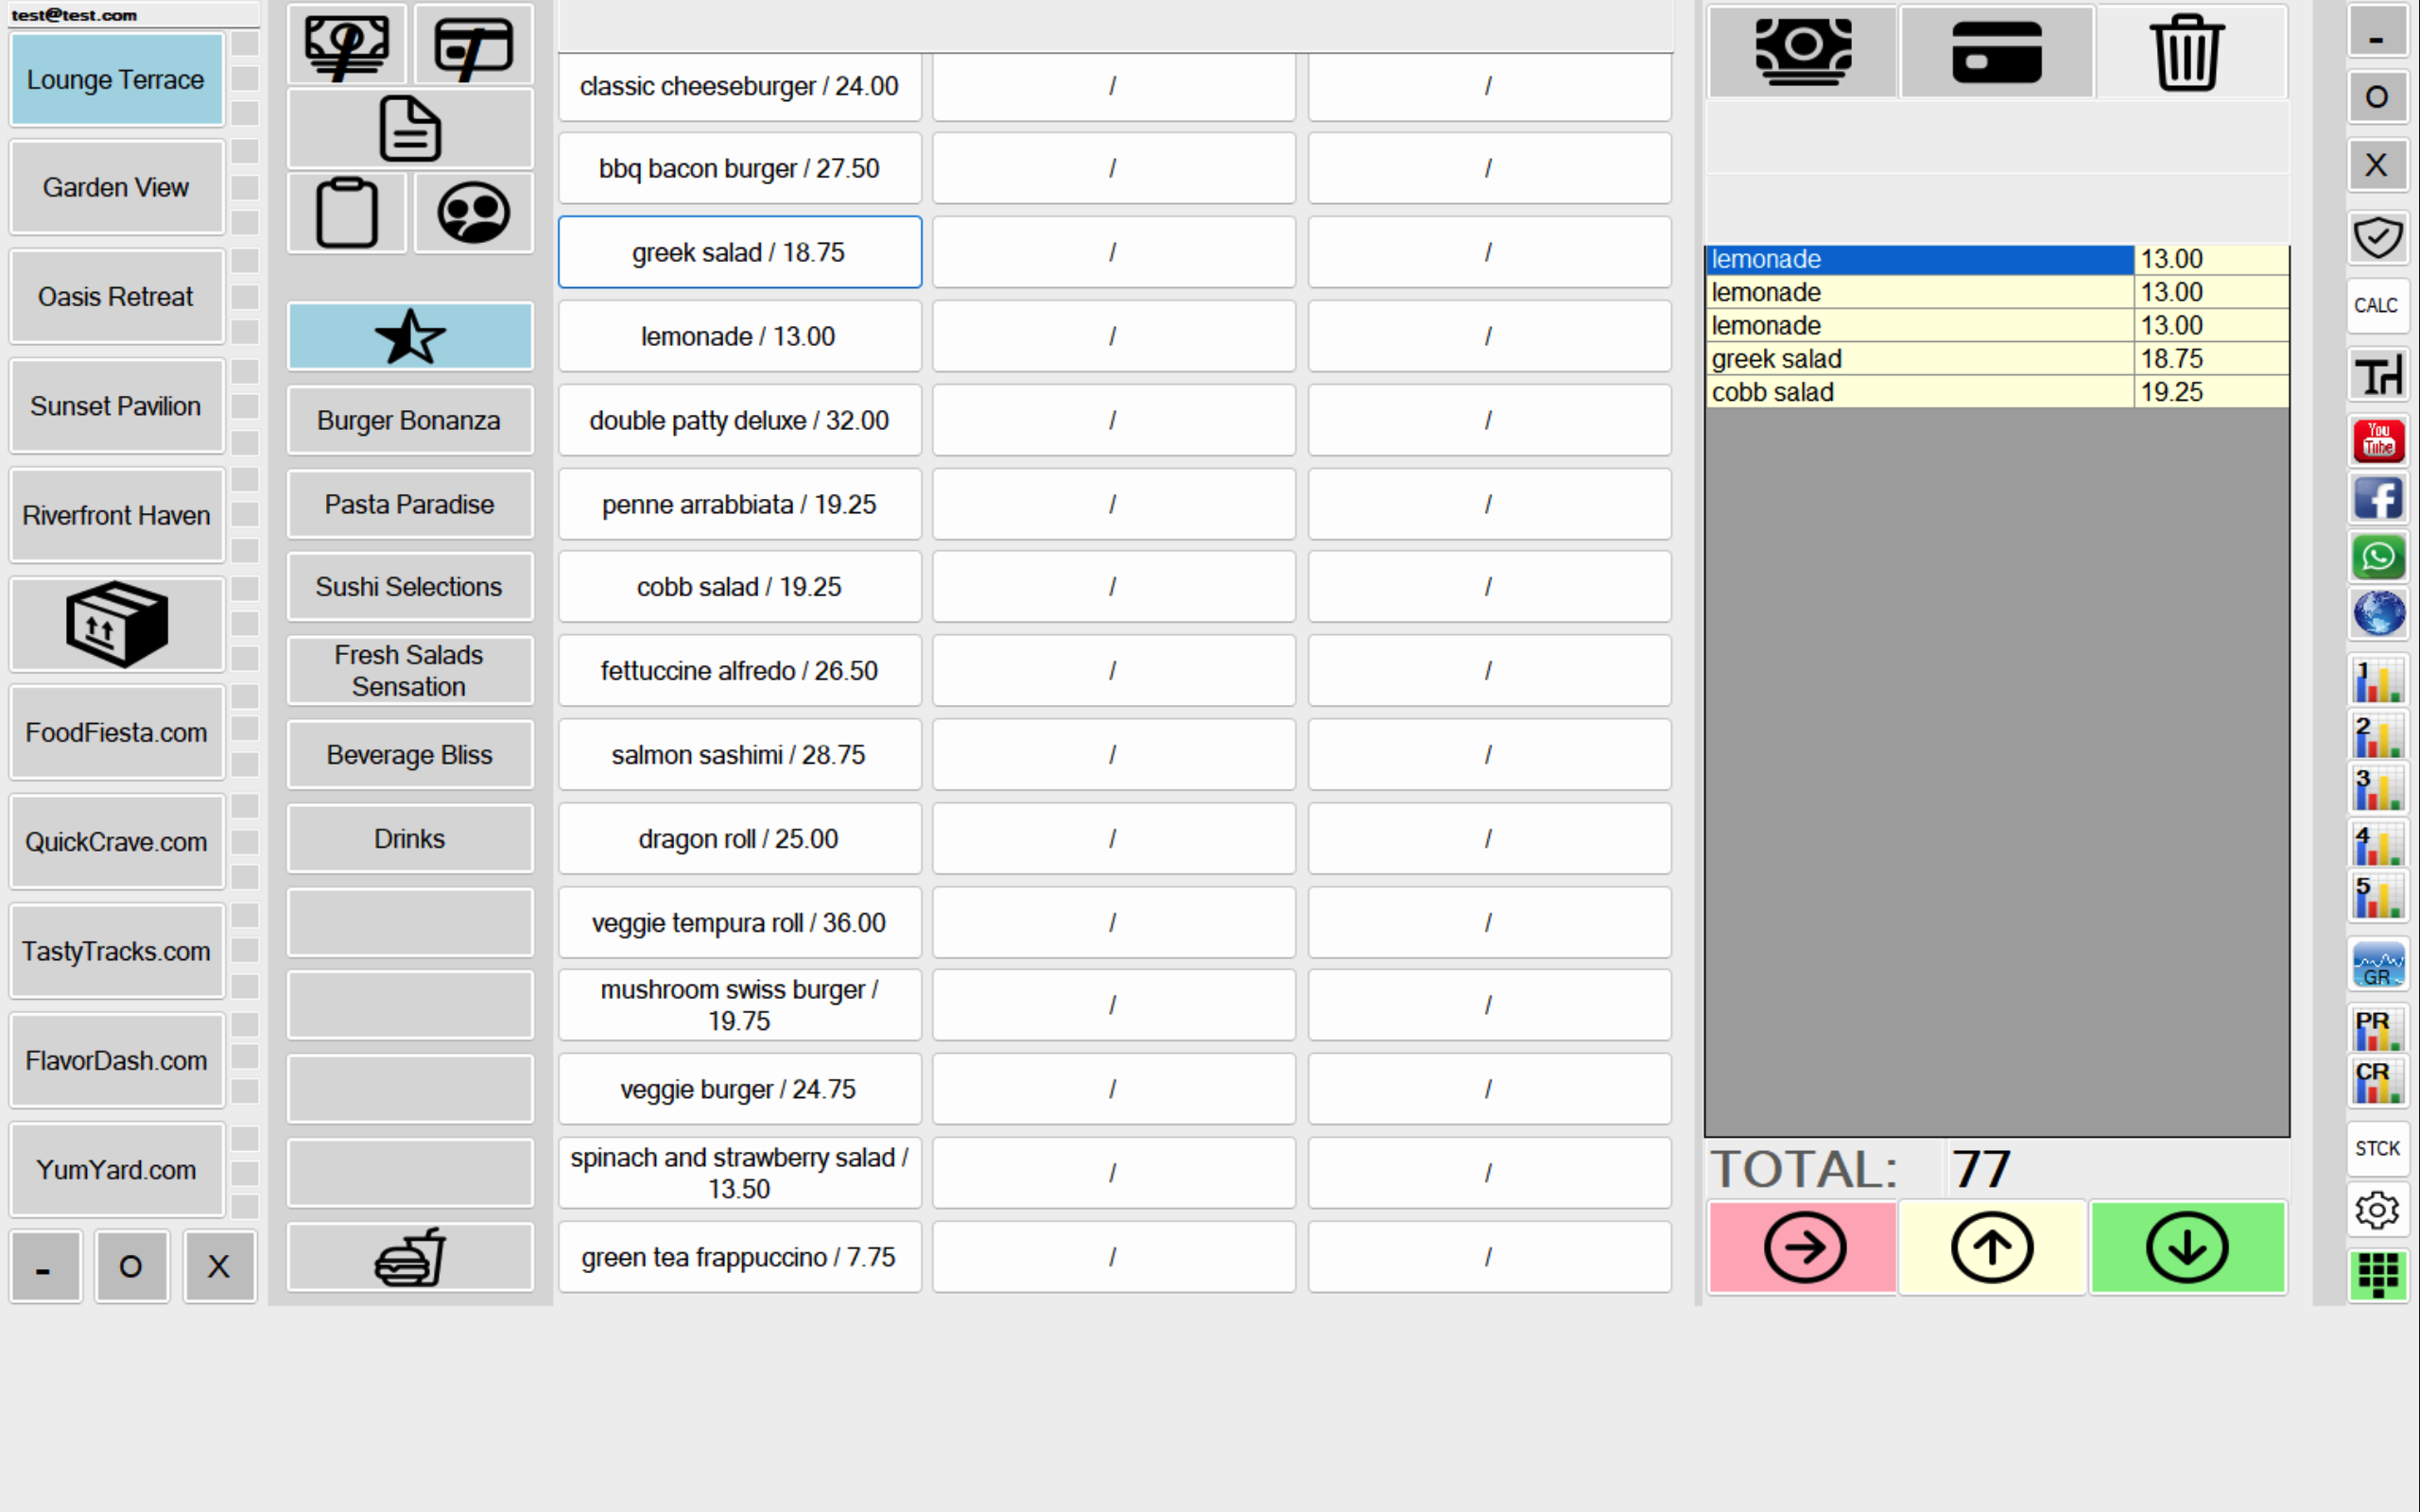
When you click with the left mouse button on the Favorites button and the buttons below it, the view on the screen opens. This gray area is the order-taking area. Here, you click on the desired item from the products within the menu options and create an order. If you want to add a note to a placed order (e.g., medium rare, less salty), you can click on the note button, write a message, and save it after confirmation.
Once an order is created, it needs to be confirmed to be finalized. To confirm, press the red right arrow button, and the order will be directed to the kitchen. After pressing this button, the user or waiter cannot make any changes or deletions. Managers and admins, on the other hand, can perform deletion at any stage. Once the kitchen prepares the items, they press the yellow up arrow button. In this case, the waiter is informed that the order is ready, and they can deliver the item to the customer, pressing the green down arrow button. This action indicates that the order is completed.
A completed order means that the customer can make a payment. When receiving payment from the customer, you can use buttons like cash, credit card, partial cash, or partial credit card for the payment process.
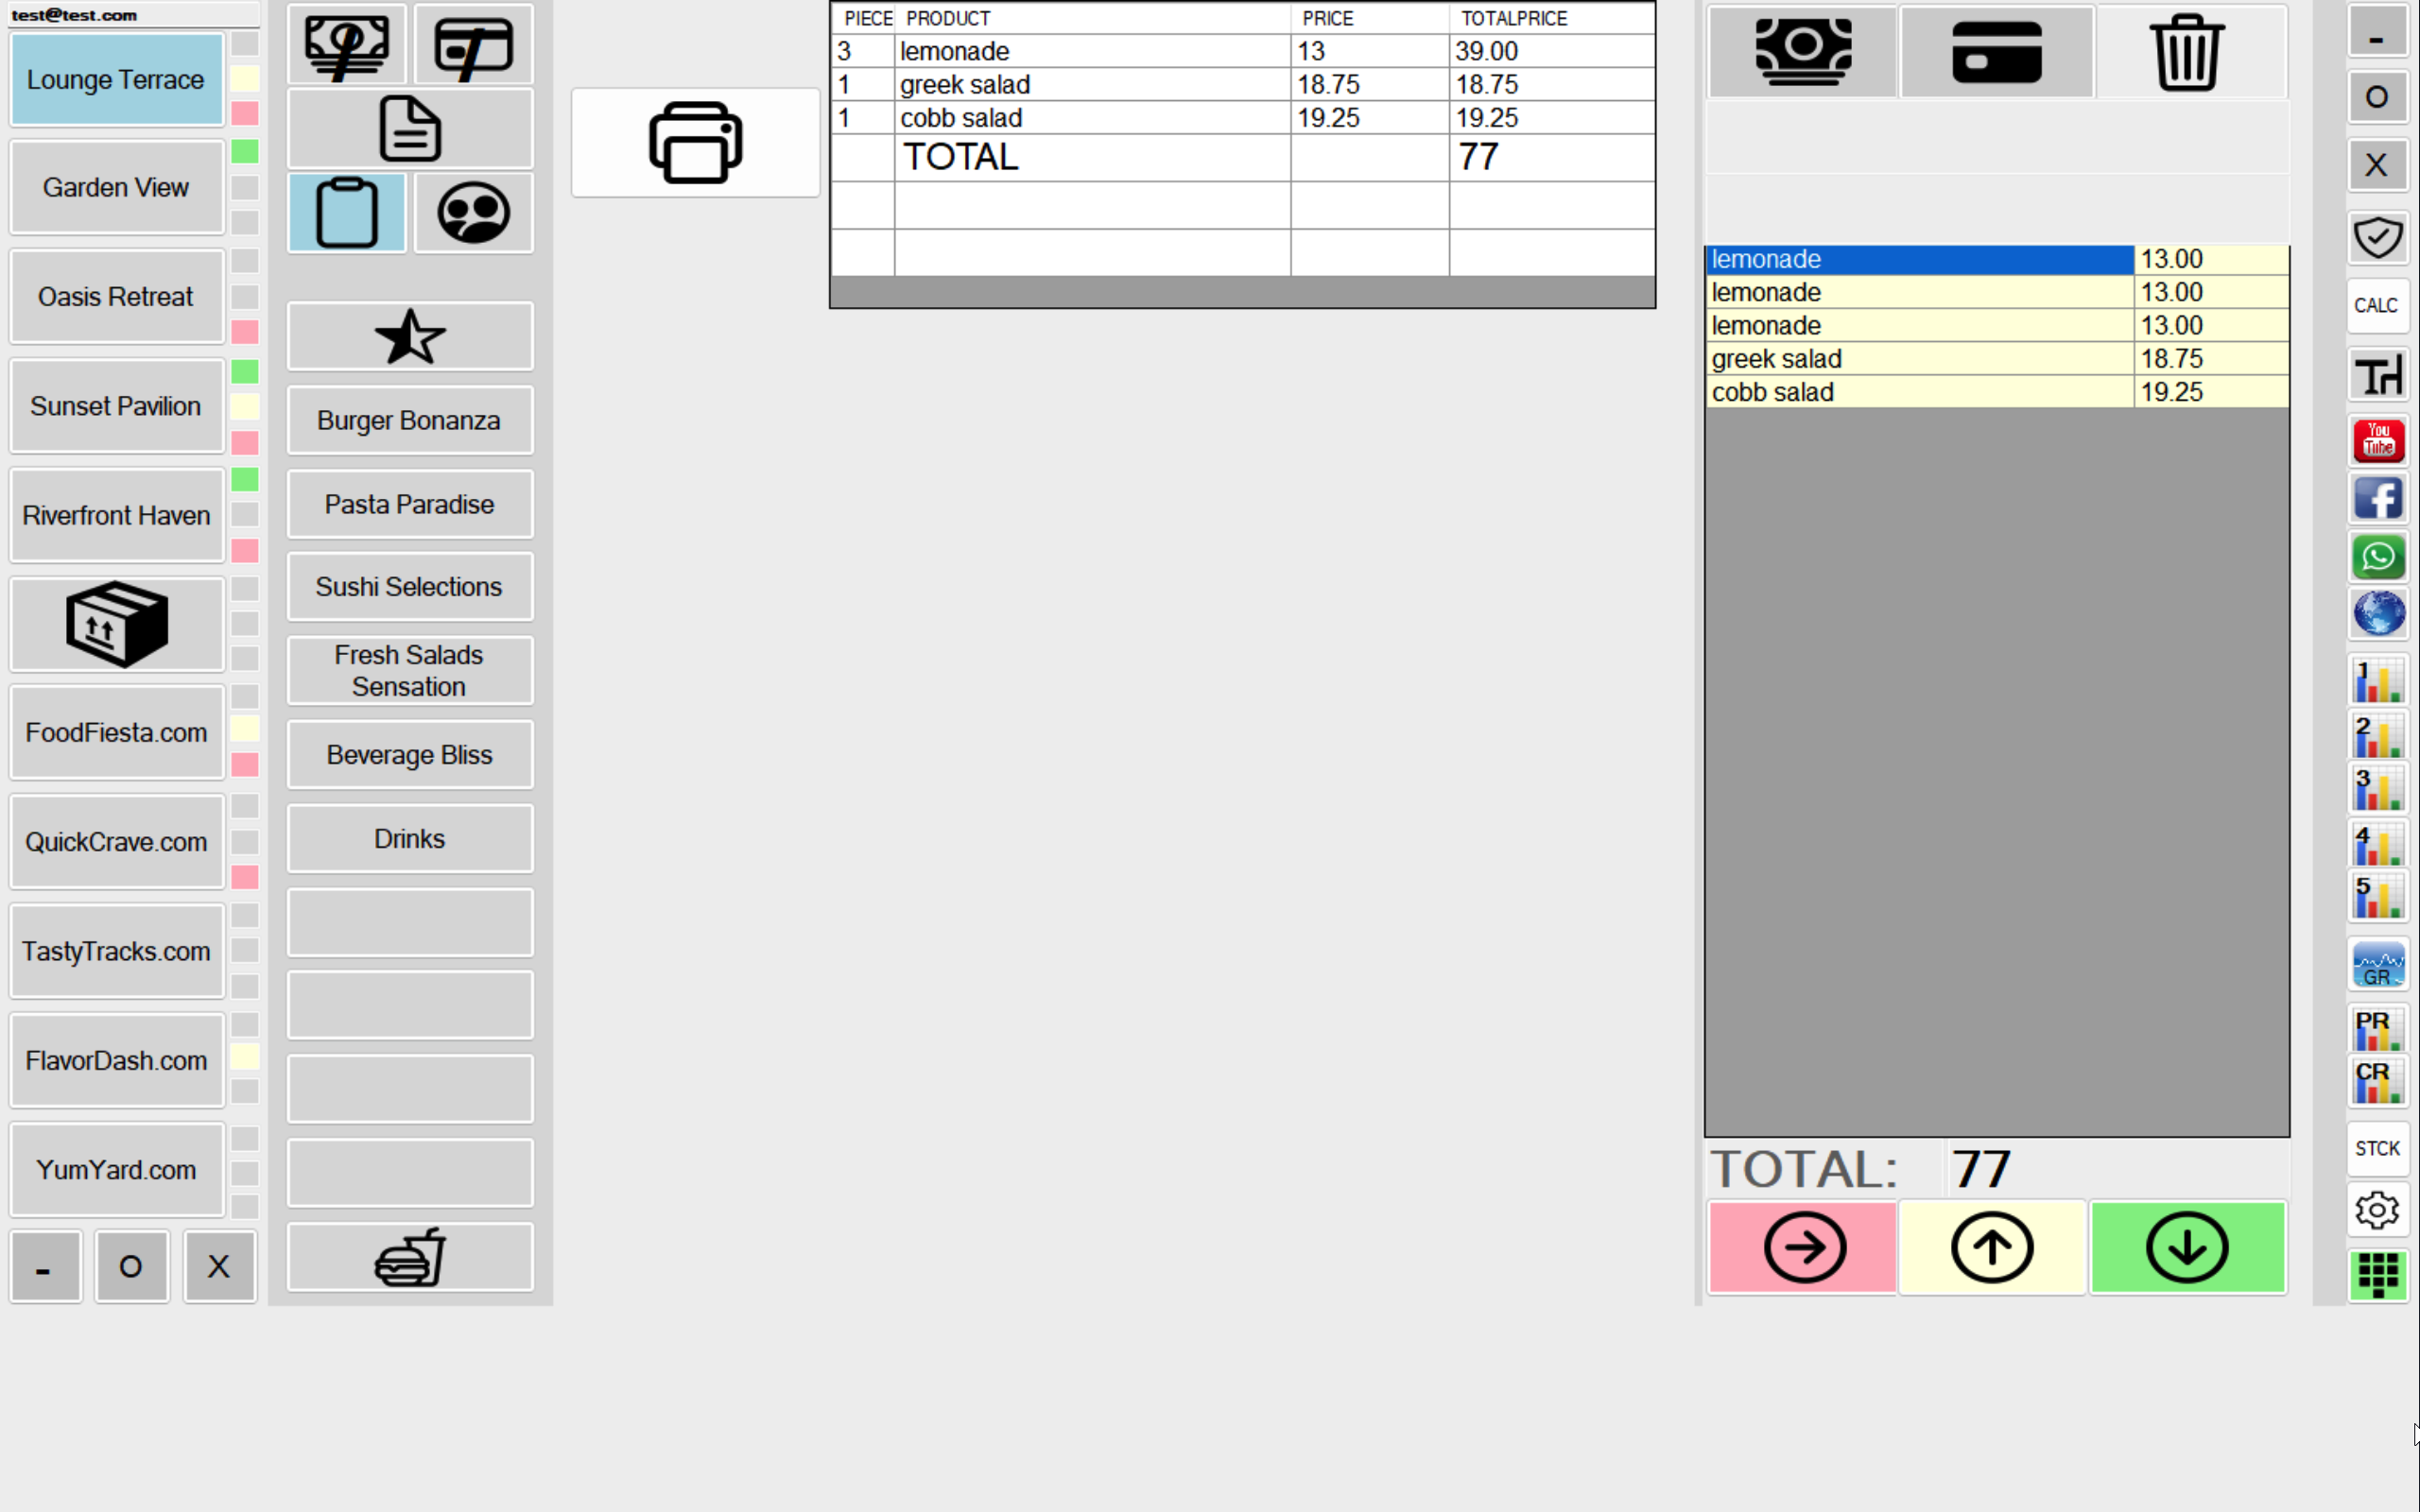
The highlighted area represents the check (bill). By clicking on this button, you can print the check from the printer or view the items entered into the table based on quantities. If you choose, you can print it from a selected printer using the print button next to it.
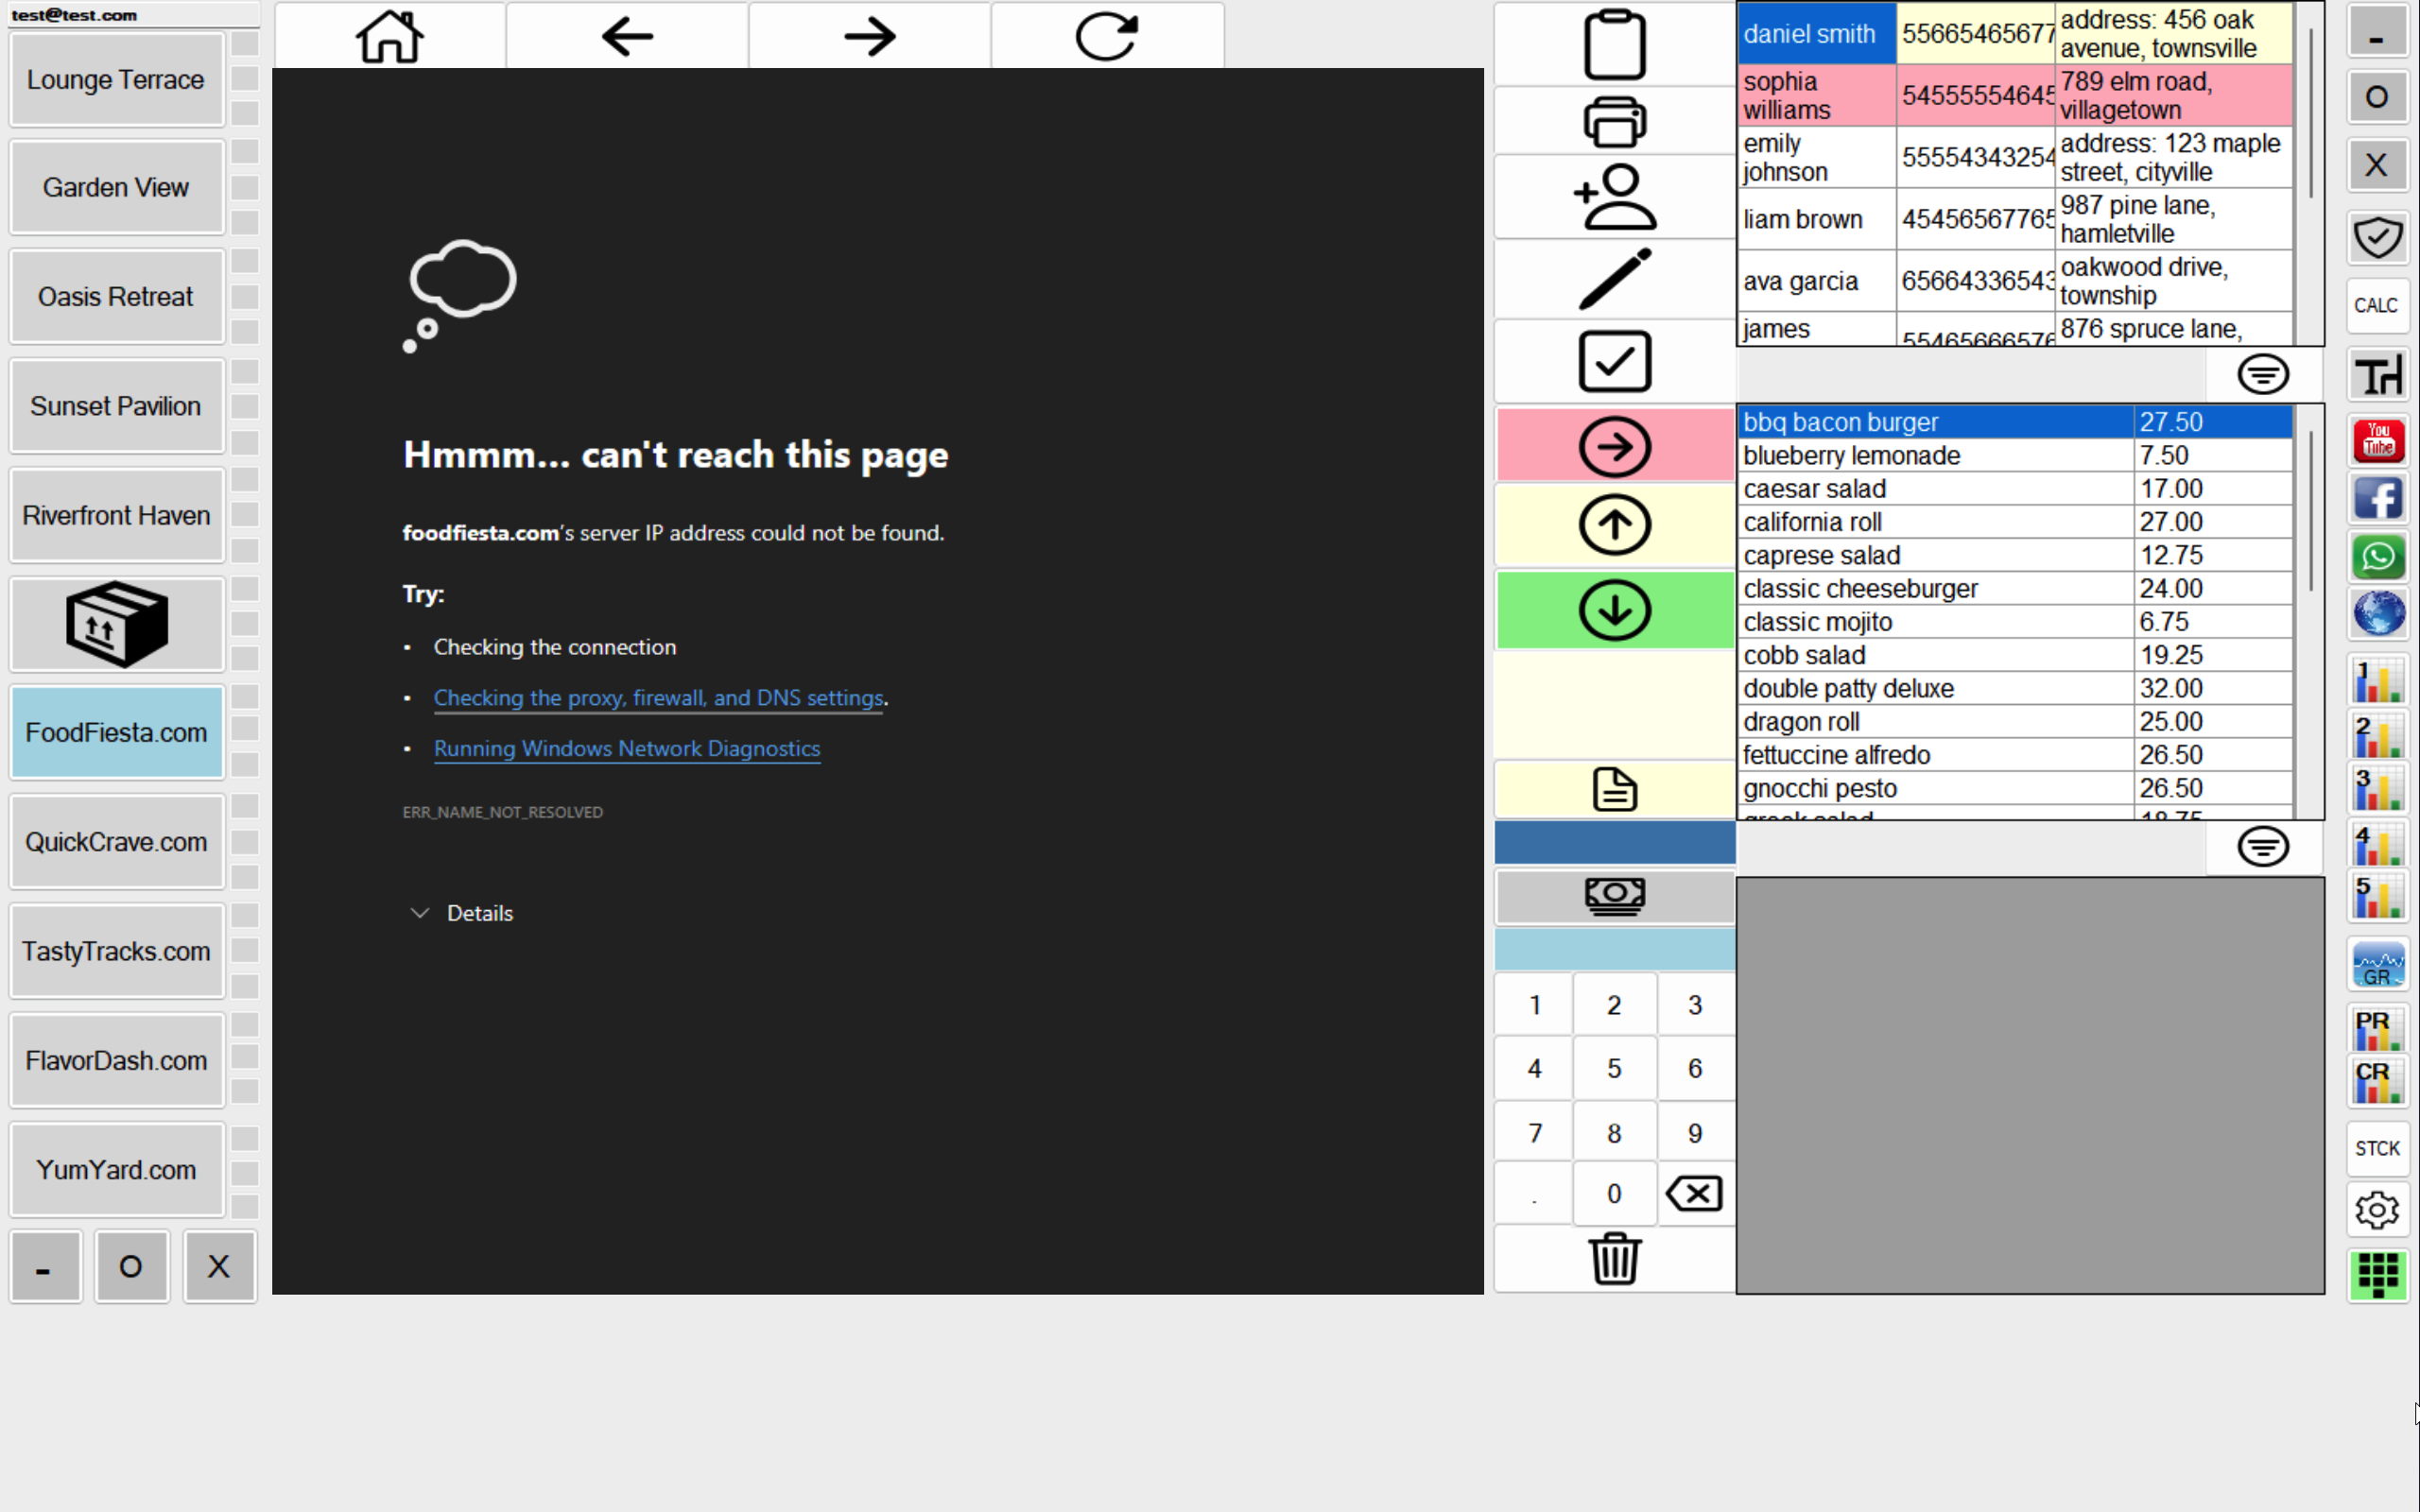
You can also track orders received from online sales platforms, as mentioned earlier, through CafePro Tulparx. To do this, if the customer is registered, you can double-click on the customer and select them in orange. If not, you can save a new person through the “New Person” button. By double-clicking on the customer and selecting them in orange, the online order will be added to the customer’s account from the list of items below. The crucial point here is the difference between the online sales price and the in-store sales price. You need to manually enter the price seen on the web to reflect the correct amount.
If a customer appears in blue, it means that the items have been added but have not yet been sent to the kitchen. If the customer is shown in red, it indicates that the order has been sent to the kitchen. If the customer is in yellow, it means that the order has been prepared and packaged in the kitchen. The person in the Package position, after delivering the item, can confirm the delivery by pressing the green tick, and the bill will be closed.
If you want to add a note, you can click on the yellow area and enter your note. If you want to remove an item from the bill, select the item, turn it orange, and click on the trash can icon. Managers and admins can do this at any stage, but users can only do this before creating the order, i.e., before pressing the red arrow.
From this point on, when you click on the CALC button on the right, you can use the calculator.
The table and chair button change the table. To use this button, first select the table you want to change and click on this icon, then click on the table you want to move to.
When you click on the Youtube icon, the Tulparx site and Youtube open together.
Clicking on the Facebook icon opens your Facebook and Instagram accounts together.
Clicking on the Whatsapp icon opens Whatsapp and normal SMS services. Additionally, the customer list is displayed on the screen, and you can copy the numbers of customers via the copy button and paste them into the Whatsapp or SMS number section. Afterward, you can communicate with your customers.
When you click on the browser icon, you can load 16 websites of your choice into the left column. This way, you can restrict users from accessing pages other than the ones you have allowed. Changing these 16 websites can only be done with the admin password.
You can use the information obtained from this section in any way you like through the Excel, Word, or PowerPoint buttons.
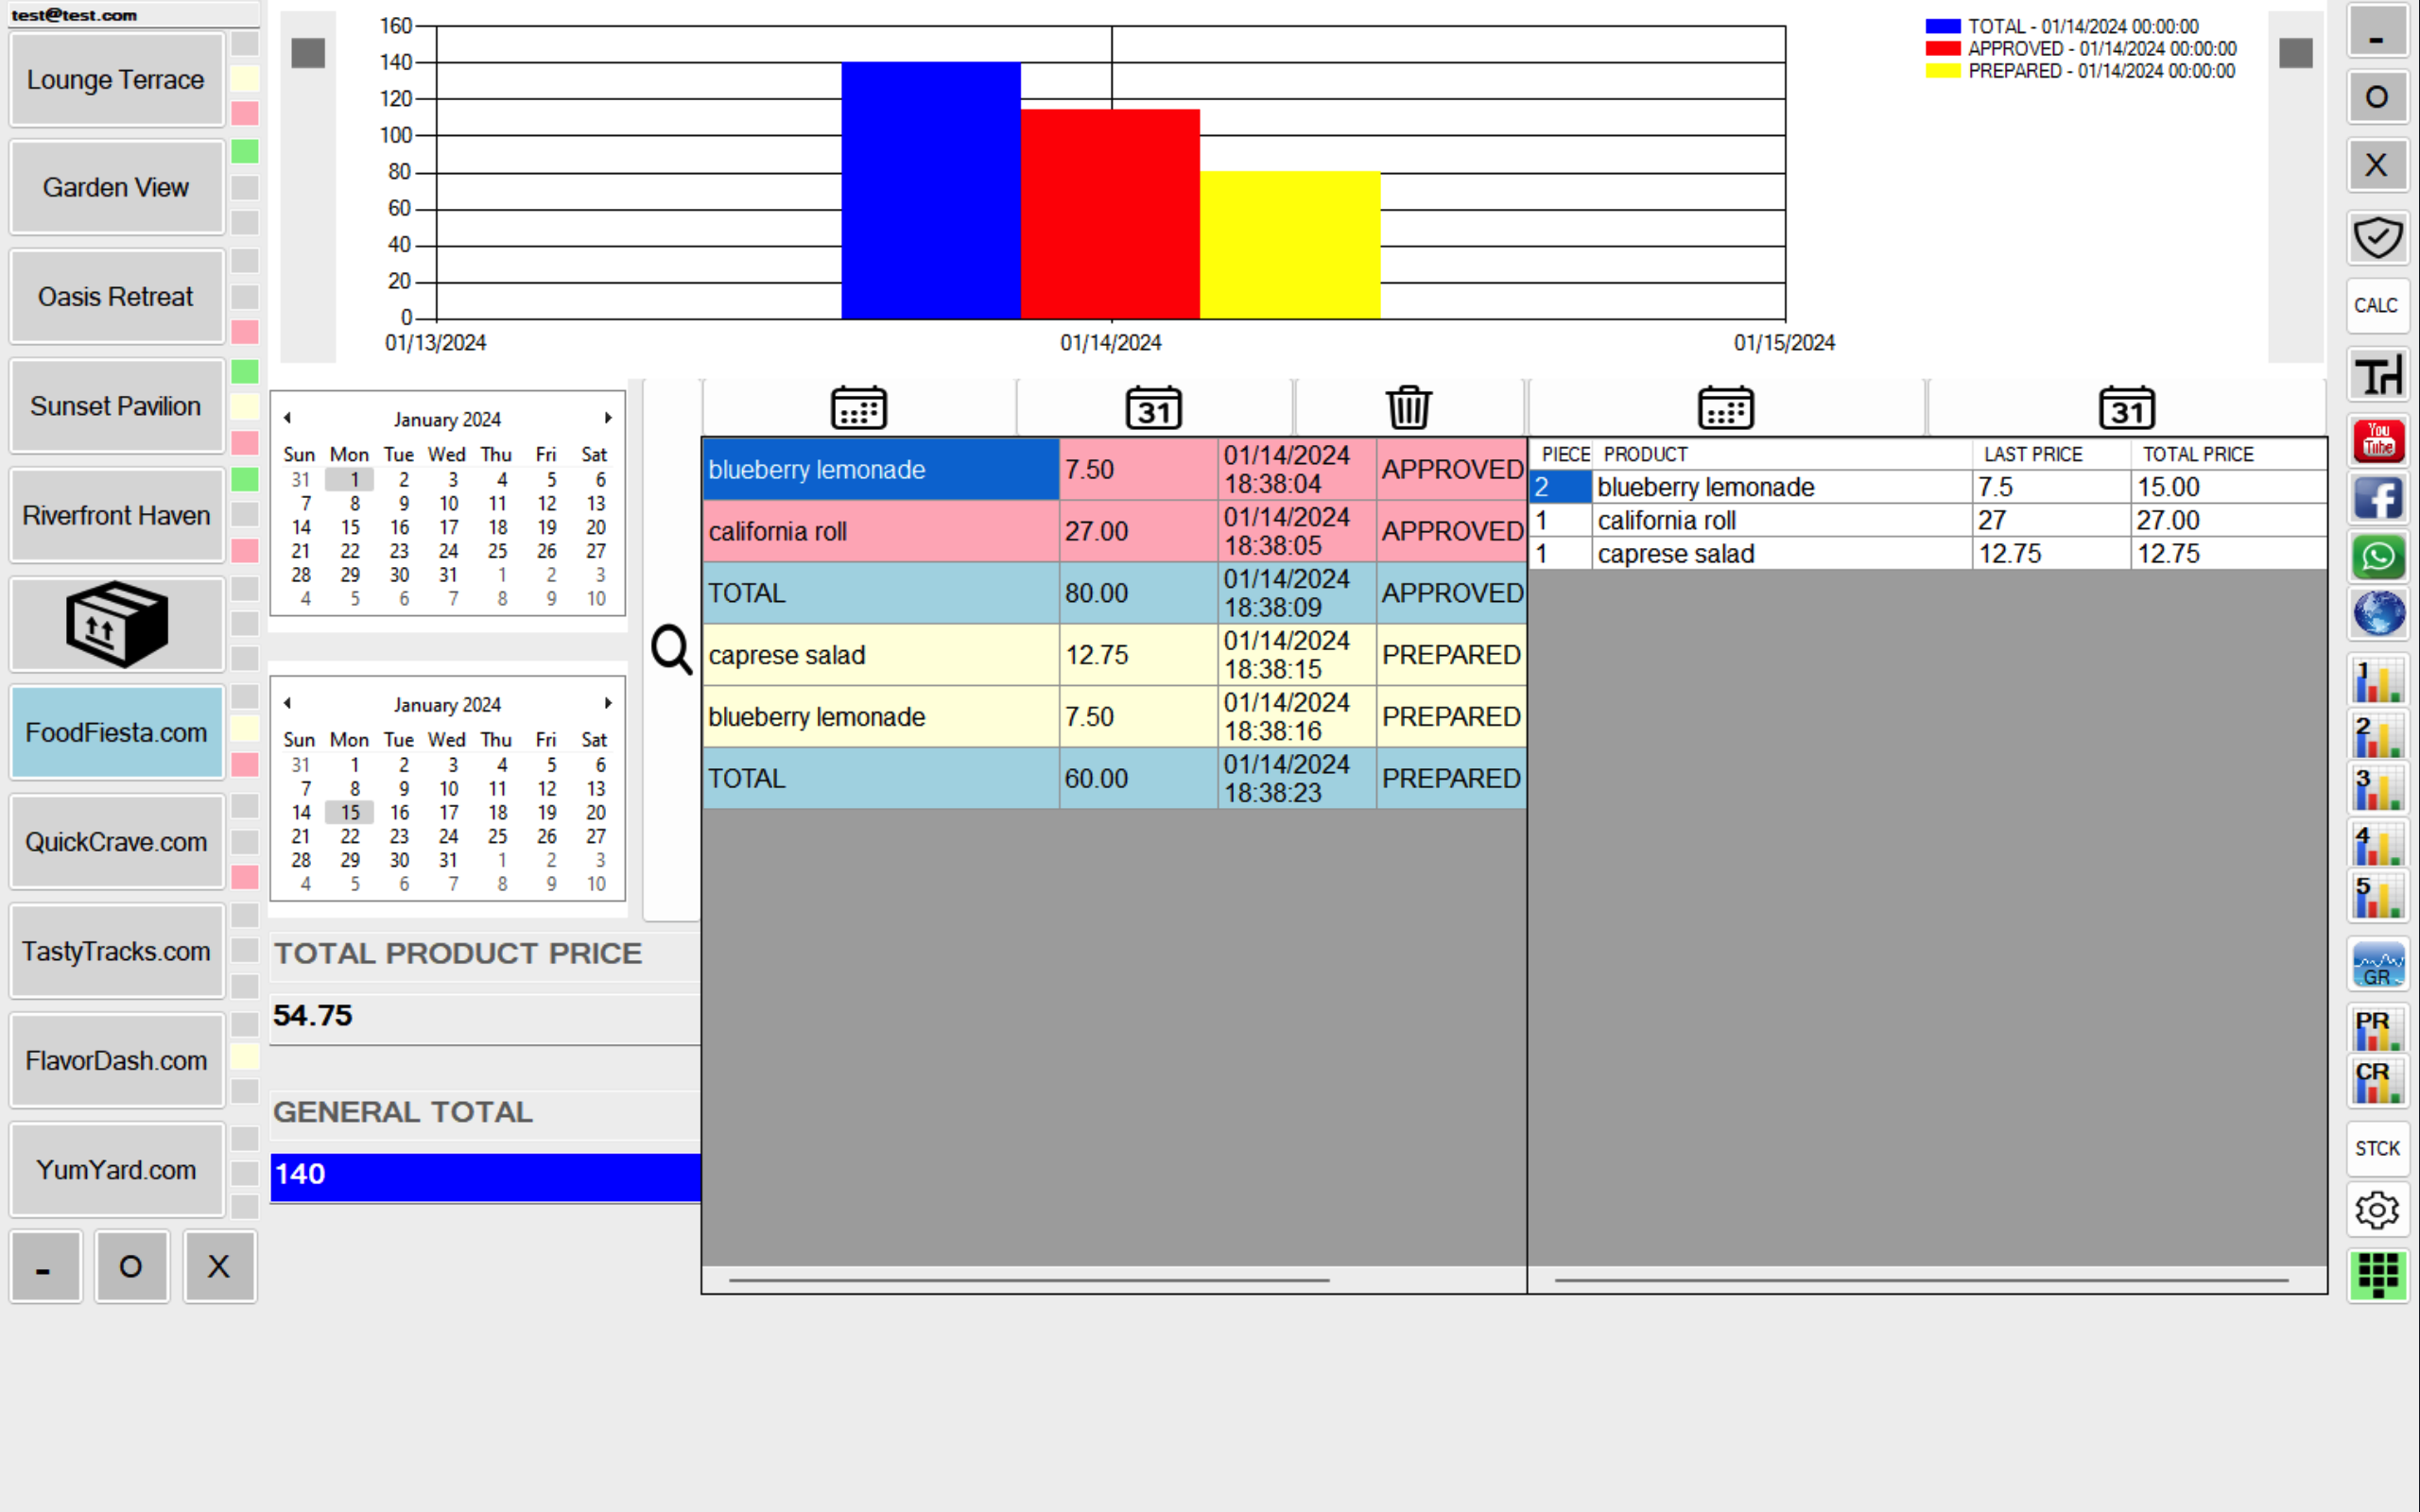
When you click on the first graph icon in the right column, it provides details/statistics related to the first online sales site that you have previously defined. The second one provides details about the second online sales site you have defined. By following the indicators on the screen, you can compare data, see which product sold more, and compare selected two or more products (up to 5 products) on a monthly or daily basis. The colored area in the middle column shows the transactions in the selected time range, and these transactions are also described with colors. For example, you can track the flow of time between processes such as delivering a product, collecting its payment, or just taking an order and sending it to the kitchen.
It’s important to note that there are two different prices in the bottom left corner: total product price and general total. The first one shows the store selling price of these products. The second one is the online sales price, which includes web and courier expenses. The general total is the amount to be collected from the customer.
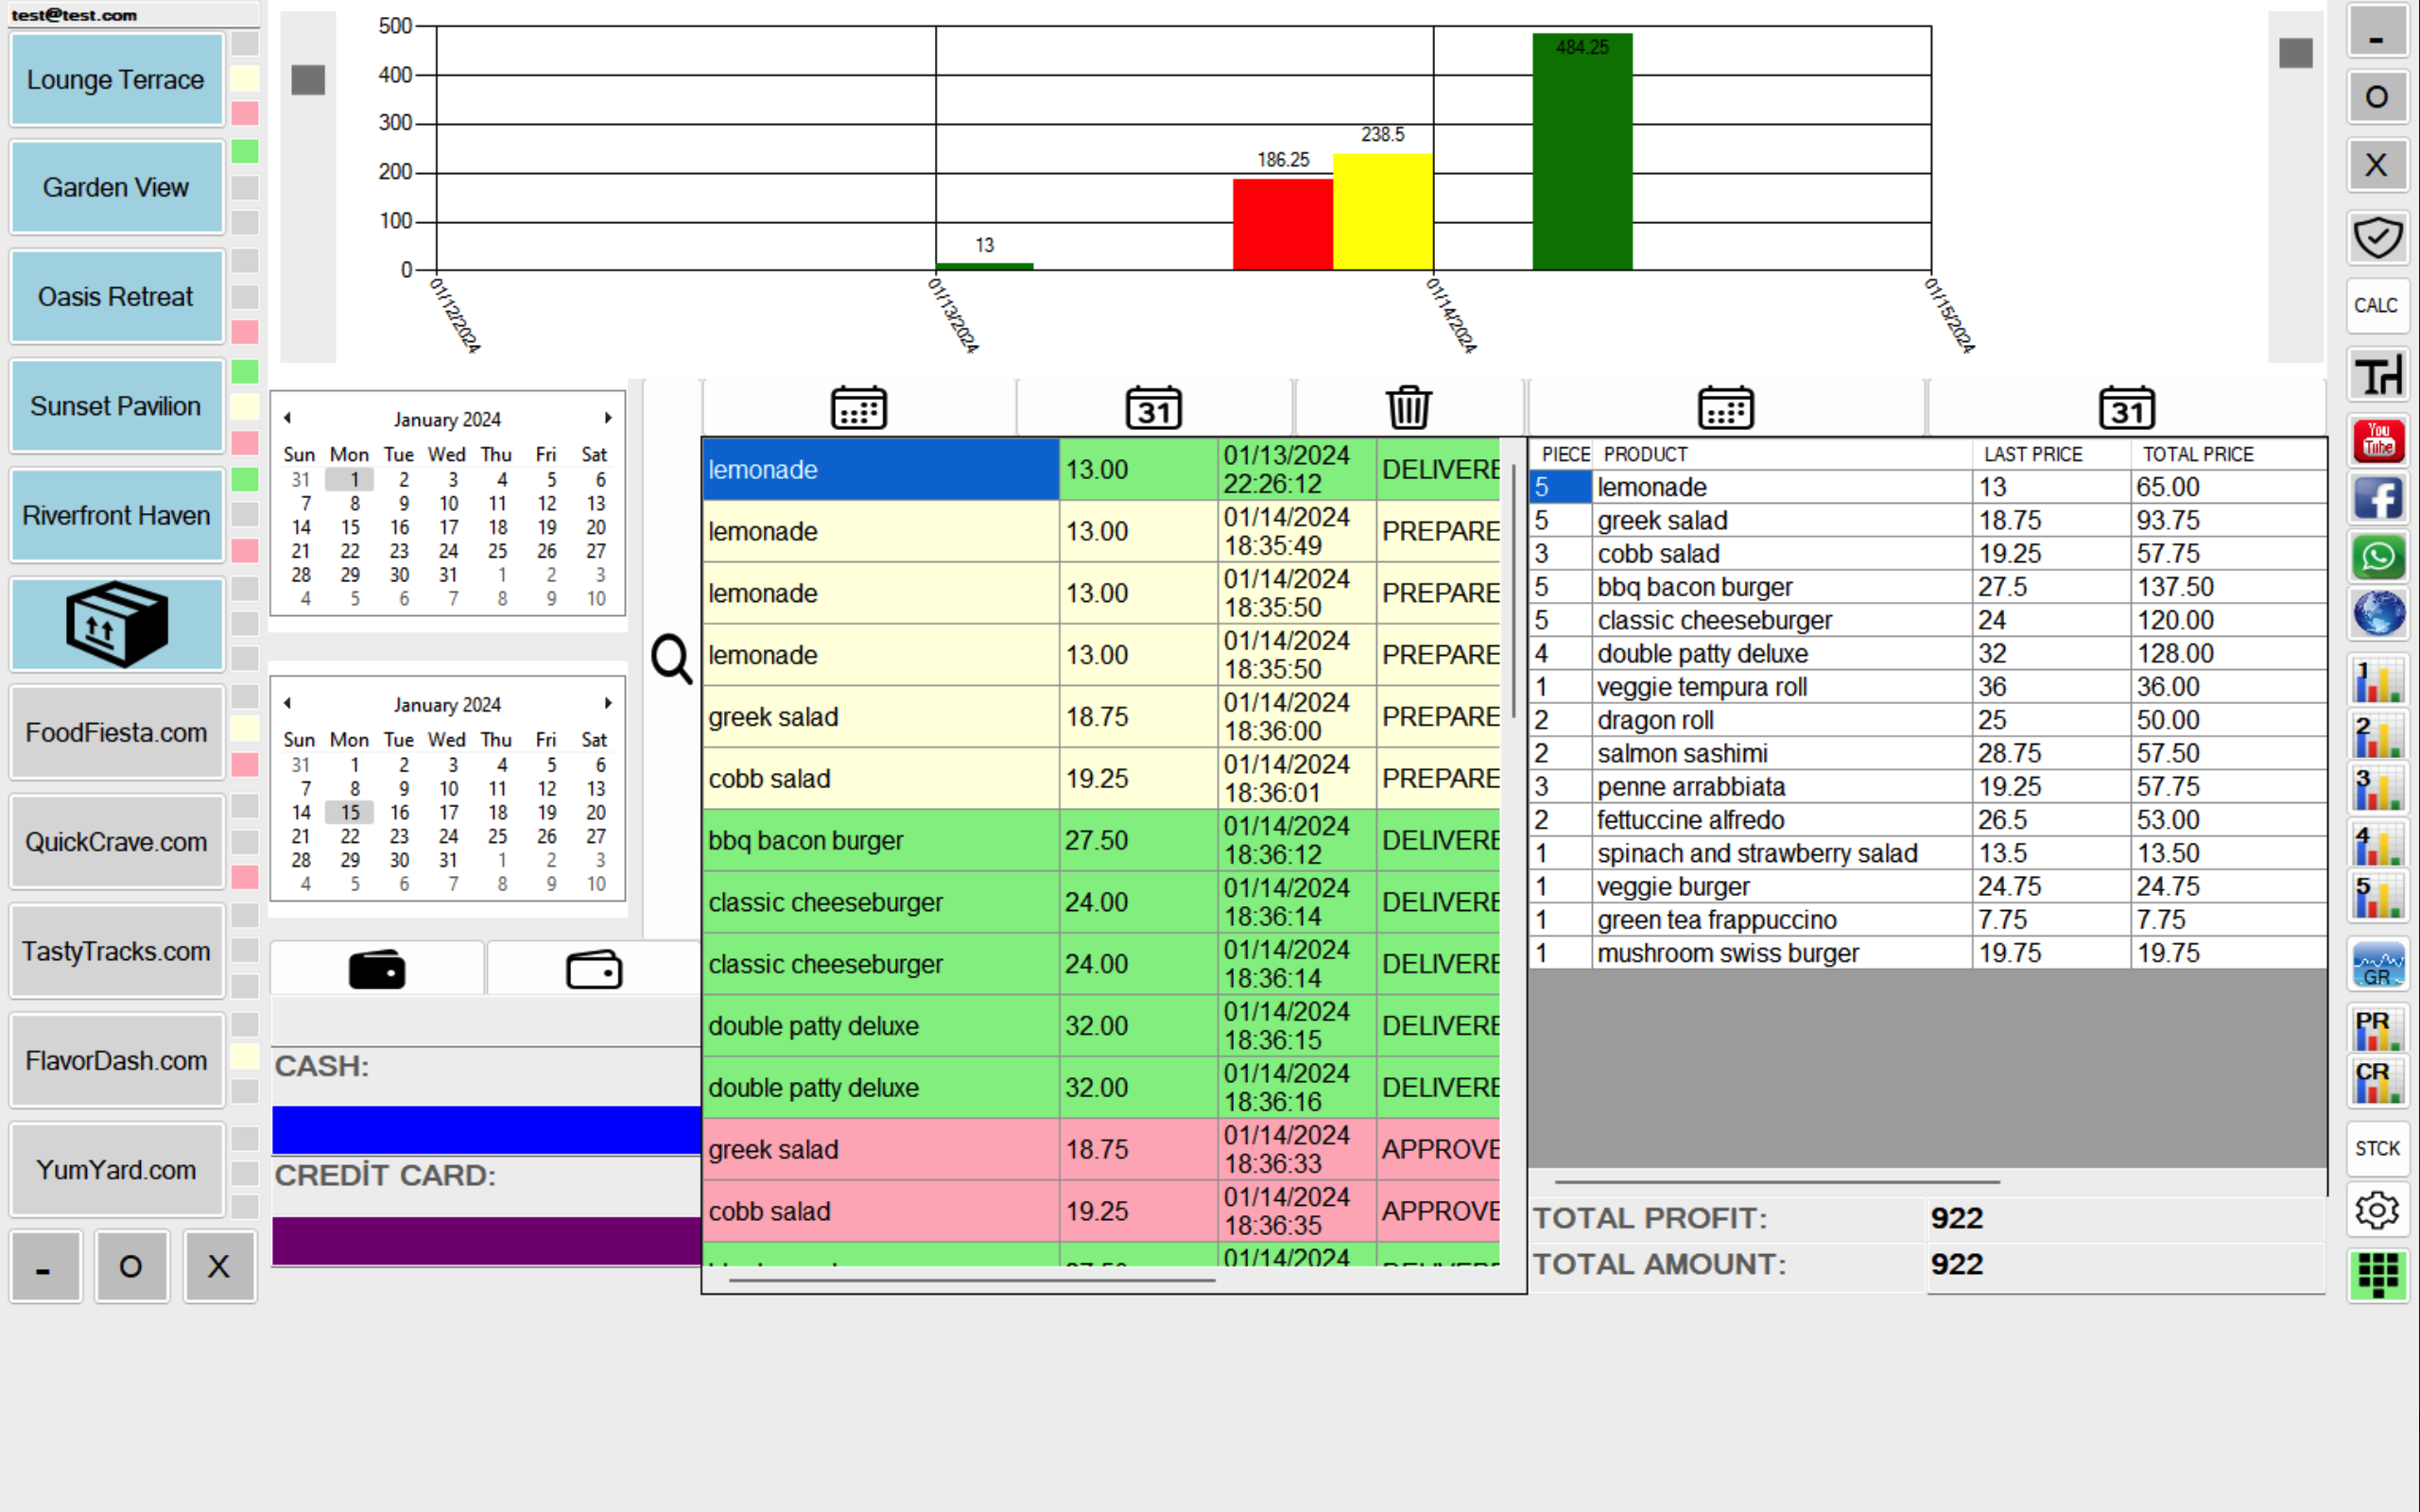
The GR button opens a page showing statistics and data for all transactions outside of online processes. Additionally, cash register operations can be performed from this page.
When you click once on the black wallet symbol in the bottom left corner of the screen, it shows the date of the last cash register closure. After the last cash register closure, you can see the collection, and how much of it is in cash and how much is by credit card. If you want to close the cash register, click once on the white wallet symbol.
The total profit and total amount in the bottom right corner show the profit and total sales if costs are entered for the products.
In the screen opened by the PR button, you can analyze the efficiency of the staff. When you double-click on the desired person from the list of staff in the top left corner, all the sales of that person are displayed on the screen.
The screen opened by the CR button allows you to observe data related to registered customers. This way, you can track customer preferences, how often they visit your store, or their spending patterns.
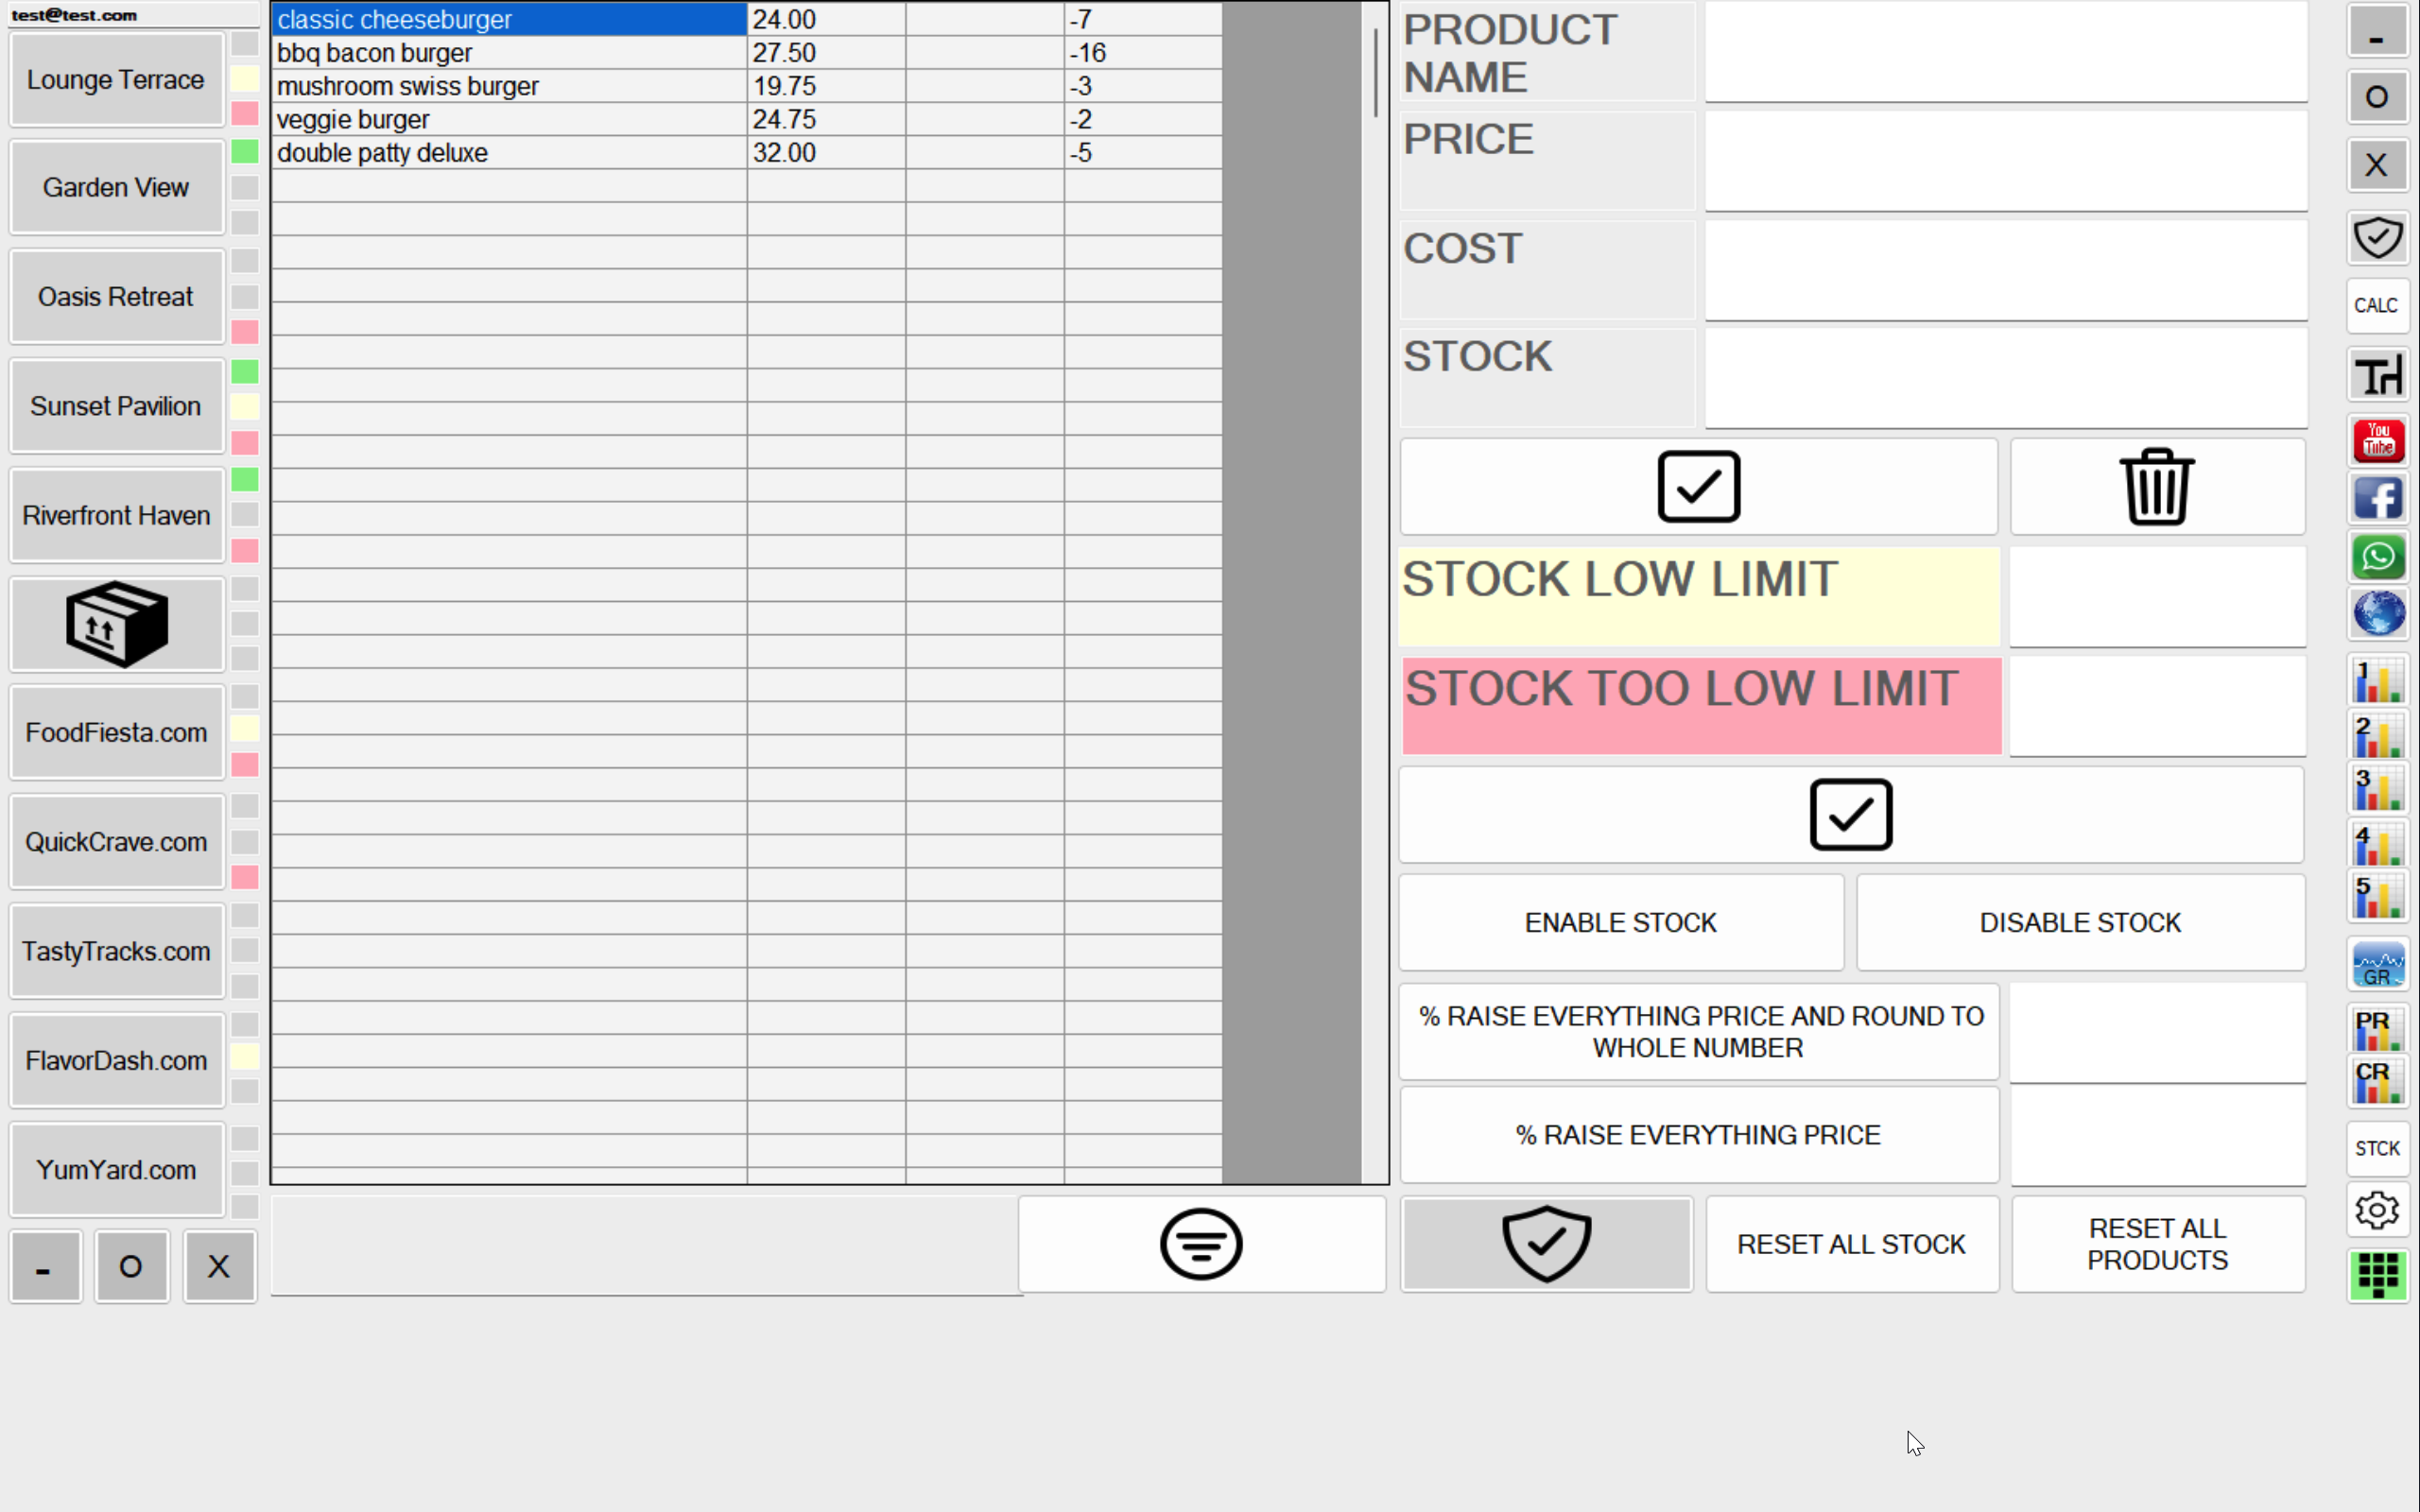
n the screen opened by the STCK button, you can track inventory, enter product information, and input cost details. When you double-click on an existing product or an empty row, the information on the right side can be modified/filled, and the process is completed by clicking the save button.
By setting desired values for Stock Low Limit and Stock Too Low Limit buttons, you can receive alerts in the order areas when the stock reaches specified levels. For example, you can receive a stock low limit alert when there are only 3 units of a product left.
You can enable or disable inventory tracking.
You can increase the prices of all products by a desired percentage with a single button and round them to the nearest whole number.
You can also perform other operations indicated by the buttons.
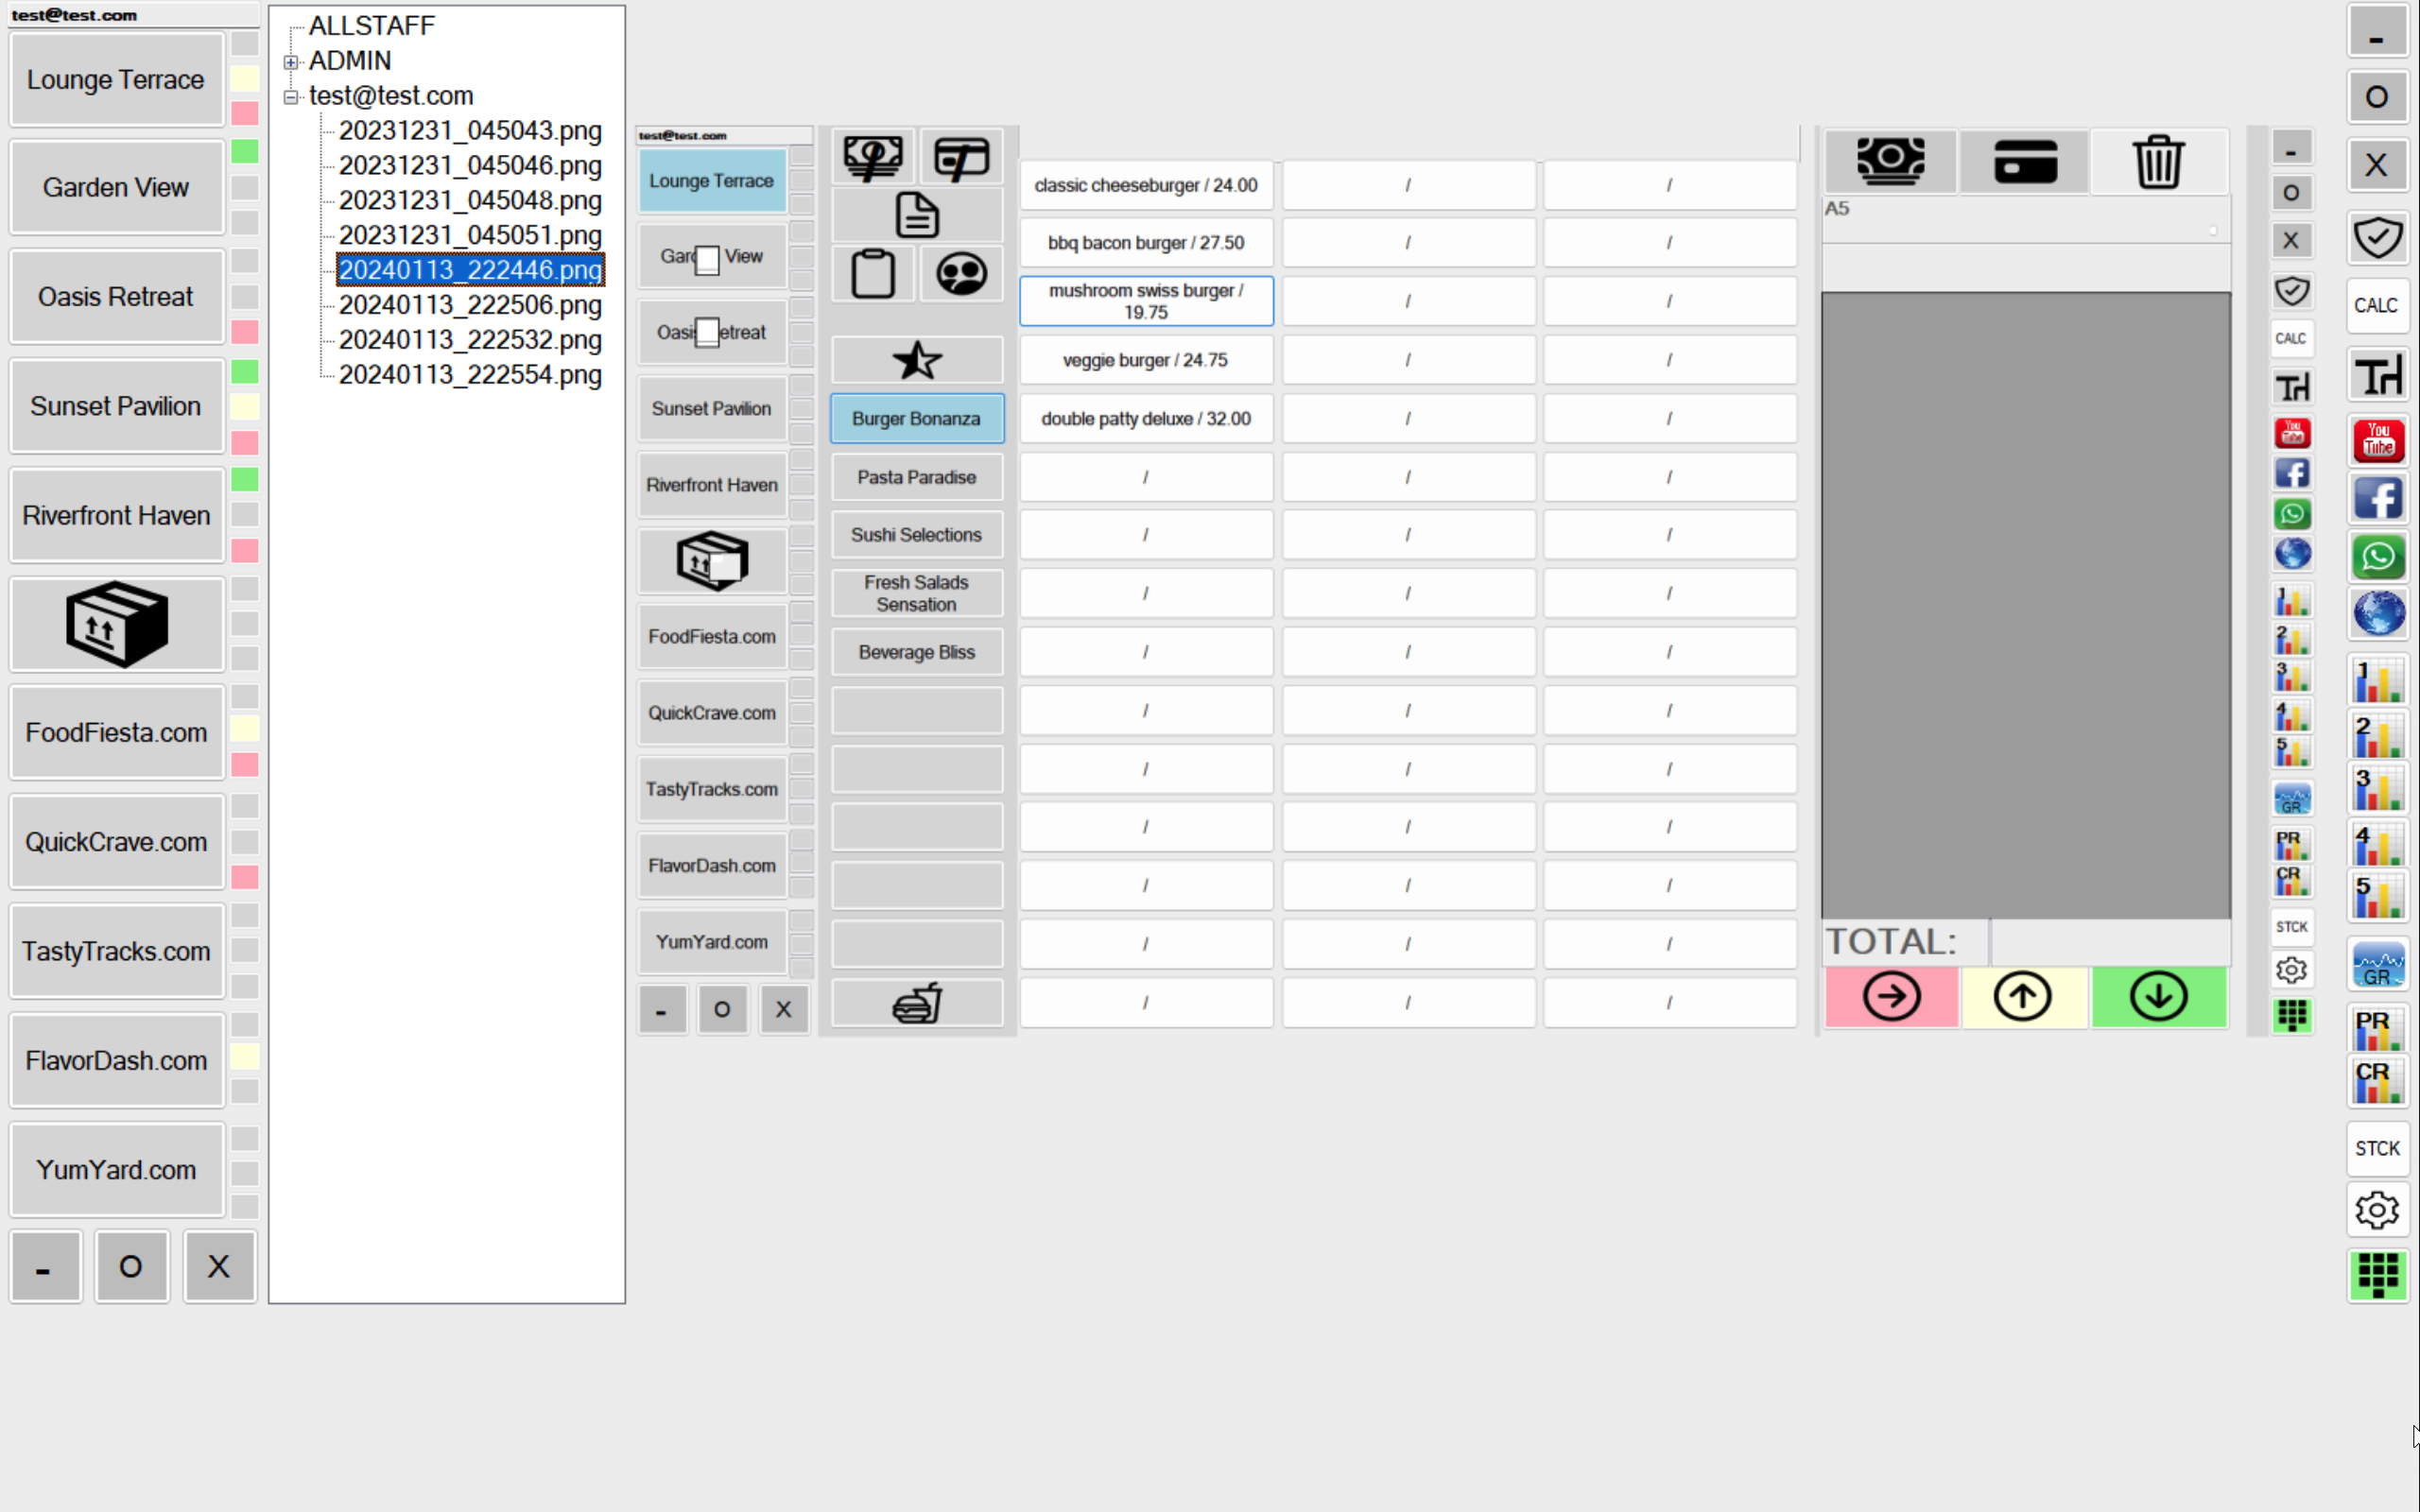
We access this screen from the guard icon in the top right corner. This screen can only be opened with admin privileges. On this screen, you can track important, deletion, and modification actions performed by other users, and stay informed about the operations carried out by your employees.
File names are in the format “YearMonthDay_HourMinuteSeconds.png
You can delete the selected file or folder by pressing the Backspace key.